1.1. Do you support both Windows, Macs, Linux, and Mobile (iPhone, Android, etc.)?
Yes absolutely! The software works on any device that can a modern web browser. Officially we support the following web browers: Chrome, FireFox, Edge, and Safari.
The software can handle as many units as you wish, there is no cap on the upper limit. You can find more details about the costs on the pricing page.
1.3. How do I transfer my database from the previous Editions to the Cloud Edition
Introduction
These instructions assume you've already been invited to the private pre-release of the LandlordMax Cloud Edition. If not then please contact us at support@landlordmax.com and we can try to expedite your invitation. Please note that we will be sending out invites in batches each week over the next 1-3 months to transition existing customers before we publicly release the Cloud Edition.
If you haven't already read what's new and excisting in the Cloud Edition then we recommend you read the Release Notes for the Cloud Edition now.
How to upload your database
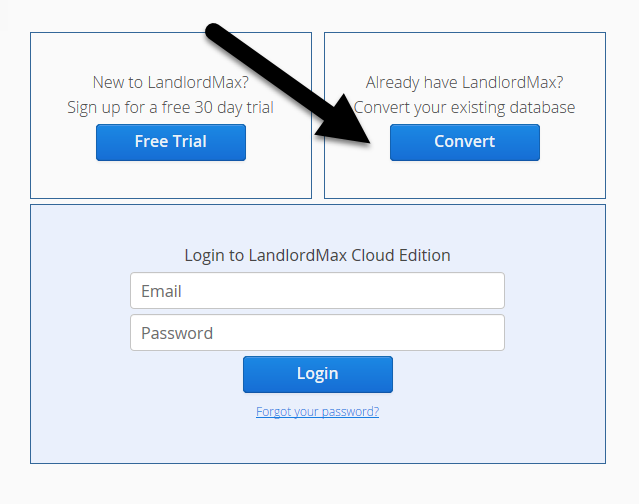
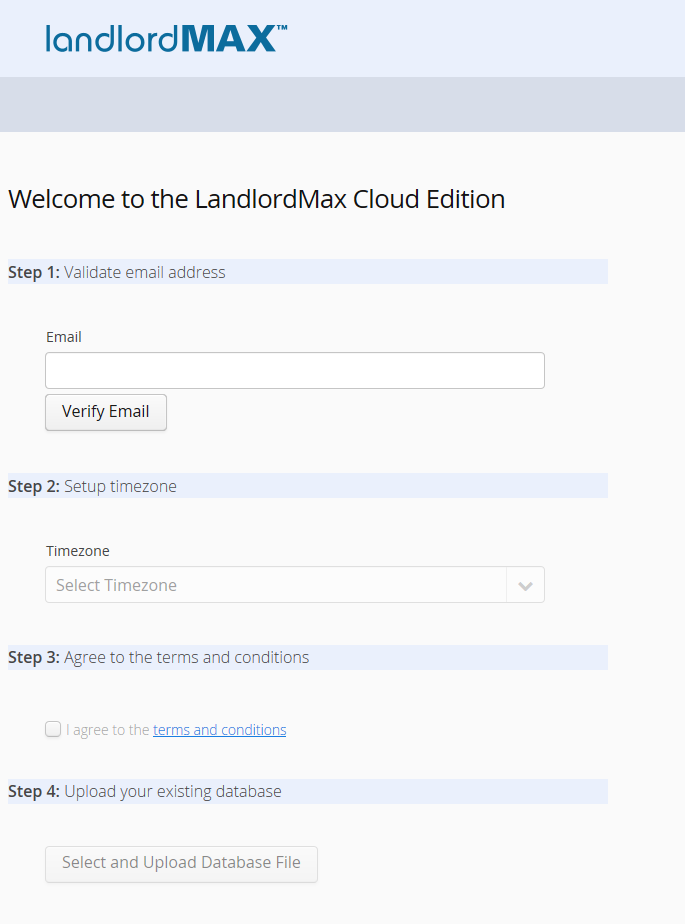
Assuming you've received your invite, the first step to upload your database is to go to the Cloud Edition webpage at: https://app.landlordmax.com There you will find the login screen. As you haven't yet uploaded your database you will need to select the "Already a LandlordMax user?" link on the login screen as shown above. This will then forward you to the "Welcome to the Cloud Edition" screen as shown below:
There are actually 6 steps to import your database and each step needs to be made in sequence.
Step 1: Enter in your email so that we can verify your invitation as well as link your database to you. With that in mind it is very important that the email address is the same as the one the invite was sent to otherwise the invite will fail. If you are going to use another email address then please contact us first so that we can make the appropriate adjustments.
Step 2: Select your timezone. Unlike the installed Editions which used your computer's timezone to calculate the scheduled entries you will need to specify your timezone because the servers may or may not be in the same timezone as you.
Step 3: Just like with any other service you need to agree to the terms and conditions to use the LandlordMax Cloud Edition.
Step 4: Select the backed up database from your computer and upload it to the Cloud Edition. If you don't already have a backup of your database you can find the instructions on how to make one in Section 9.1 of the user manual
Step 5: Although our average response time is under 3 business hours please allow up to 1-2 business days for your database to be transferred to the Cloud Edition. We are doing our best to keep response times as quick as possible and sending out invites in phases to avoid large influxes all at once as much as possible. That being said we are transferring databases on a first come first serve basis.
Step 6: Once your database has been transfered to the Cloud Edition you will receive a welcome email asking you to validate yourself and setup a password for your account. Please follow the instructions in the email.
Addendum: Log into your new account and start using the Cloud Edition!
1.4. Where can I find the Release Notes for every version?
You can find the release notes for every single version below, including all the minor releases:
2.2. How do I enter in Security Deposits for Accounting Purposes?
Security deposits are recorded with the leases information. Go in the Tenants menu, click the Leases SubPanel, then click New in the right side menu and enter the appropriate information.
To get a list of your security deposits, use the security deposit related reports.
When cashing out the security deposit (interest paid, money's owed, etc.) there are two options which are listed below:
**Important: For accounting purposes Security Deposits are a special case to which we offer you two options to handle them (the first option being the recommended option).
1. The first and easiest is just to record the security deposits with the leases and use the security deposit related reports. This keeps the information simple. In this regard you'd only enter in a Accounting Entry for the difference when cashing out the security deposit (interest paid, money's owed, etc.) because the rest is just considered a deposit and not an income (portion kept for repairs, etc.) or expense (interest paid on deposit, etc.). As well by going this route it separates out your "real" revenues from your deposits.
2. The alternative option, depending on how you look at your business model, is to simply add the second amount as a new accounting entry associated to a new custom accounting category (which you can create) called "Security Deposit". However this means the security deposits would appear as revenue in your reports (including cashflow). If this is your preferred business model, which for some people it is, then you also have this option.
2.3. Why do my tenant's rent still show up in the Suggested Entries after the tenant was moved out?
Your tenant has moved out, you updated their Status to Past and entered an Ending Date in the Lease information but you still see a Suggested Entry for their rent every month. Why?
Although the software automatically creates Scheduled Entries for you from the Lease information they are not linked because of several reasons. For example the rent can be paid late, rents can be paid after a lease is completed, etc. As well some Tenants will transition to a month to month rent without a Lease, and therefore some people prefer to just keep the Scheduled Entries around rather than having to re-enter a new one manually. Therefore, when a Tenant moves out, you will also have to delete the Scheduled Entries.
As well, for the same reasons, editing a Lease does not adjust the Scheduled Entries, or any other related entries for safety reasons. For example, if it did, editing a Lease would then cause your previous Accounting Entries to also be edited, which is very likely wrong and could result in a lot of accounting errors. Therefore as stated before, although Leases do create Scheduled Entries, they are not linked to the Scheduled Entries they have created.
This is also true if you change the Tenant's Status to Past because it's very much possible to have a past tenant still owe you monthly rents from an existing lease (for example a tenant that is no longer living there but still has some time left on the lease, or a parent leasing a unit for their college kid during the summer).
For scenarios where you have multiple people living in the same unit, we generally suggest you create one principal tenant and define the remaining people as occupants in the tab Occupants.
If however you need the tenants to be completely separated such as a boarding house or where the rooms are individually rented out, then as an alternative we suggest you create additional units for the property, one for each "bedroom" or real unit rented. In other words, Unit 101 that has 4 rooms would actually be unit 101-a, 101-b, 101-c, and 101-d because in effect each bedroom is really its own unit with its own Tenant, its own Leases, and its own Accounting (rents paid, etc.)
3.2. How do I export and/or email the report I just generated?
Firstly you'll need to setup your email preferences within the computer as explained in the E-mails chapters of the online user manual. Once your email preferences have been set, then you can just email reports, invoices, etc. by clicking on the appropriate Email buttons located throughout the software.
4. Licensing
4.1. What upgrades, updates, and releases do I get when I purchase LandlordMax?
With a web based cloud subscription model you will always get the latest version as long as your subscription is active. The updates are automatically done for you. All you need to do is just go to the Cloud Edition website and login.
4.2. My trial has expired and all I see is the billing screen
Once the free 30-day trial trial has expired LandlordMax will only give you access to the billing system so that you can setup your payment option. Once it's setup and your first payment has been processed you will then have full access to the system.
** Please Note: Your data will NOT be deleted the moment your trial is over, we will keep it up to 30-60 days after the trial to give you time to setup your payment option. If after that period you have not setup a payment option then your account and hence data will be deleted.
5. Purchasing LandlordMax
5.1. What are the information and purchase privacy policies for LandlordMax Software Inc. ?
LandlordMax Software Inc. does not share, sell, or distribute any personal information to any other third-party.
LandlordMax Software Inc. may use personal information that it has collected to:
Provide you with notices of new information that may be of use or interest to you. This may include Website update notices, or notification on the availability of new products, product updates, maintenance releases.
We do NOT keep credit card information as part of your subscription, we only keep a reference ID number that is issued by the banks. The banks will in essence use that reference number to fulfill the subscription paymennts. This is intentionally done for your security so that your credit card information is NEVER stored on our systems. In fact we cannot even retrieve your credit card information from the reference ID number from the banks, that information is locked and not accessible.
Determine at our discretion your eligibility to receive product support on evaluation versions of LandlordMax Property Management Software.
Track anonymous usage web statistics in an attempt to improve our Website, our products, or our business.
The security of your personal information is very important to us. In our efforts to protect your online transactions, we use Secure Sockets Layer (SSL). Your personal information is automatically secured before it is sent over the Internet during sensitive transmissions.
Changes to the LandlordMax Software Inc. Privacy Policy
This Privacy Policy was last updated on April 10th, 2018. We reserve the right to change, modify or amend this policy at any time. Please check our Privacy Policy periodically for changes. Use of this LandlordMax Software Inc. web site after modification implies that you consent to this Privacy Policy as modified.
5.2. LandlordMax Refund Policy
LandlordMax has FREE 30-day trial of the software that allows you to try the functionality of the software before you subscribe. This gives you access to almost virtually all the features, including our expert customer support team who can answer any questions you may have. In fact you cannot subscribe until your free 30 day trial is completed!!
You can cancel a subscription at any time and no further payments will be processed. Your account will remain open until the date paid by your last payment.
* Notice: Chargebacks invalidate your subscription regardless of the outcome and if you wish to use the software afterwards you will need to both cover the chargeback fee as well as the processing costs incurred in contesting the chargeback.
6.1. How do I upgrade to the Cloud Edition of LandlordMax?
Introduction
These instructions assume you've already been invited to the private pre-release of the LandlordMax Cloud Edition. If not then please contact us at support@landlordmax.com and we can try to expedite your invitation. Please note that we will be sending out invites in batches each week over the next 1-3 months to transition existing customers before we publicly release the Cloud Edition.
If you haven't already read what's new and excisting in the Cloud Edition then we recommend you read the Release Notes for the Cloud Edition now.
How to upload your database
Assuming you've received your invite, the first step to upload your database is to go to the Cloud Edition webpage at: https://app.landlordmax.com There you will find the login screen. As you haven't yet uploaded your database you will need to select the "Already a LandlordMax user?" link on the login screen as shown above. This will then forward you to the "Welcome to the Cloud Edition" screen as shown below:
There are actually 6 steps to import your database and each step needs to be made in sequence.
Step 1: Enter in your email so that we can verify your invitation as well as link your database to you. With that in mind it is very important that the email address is the same as the one the invite was sent to otherwise the invite will fail. If you are going to use another email address then please contact us first so that we can make the appropriate adjustments.
Step 2: Select your timezone. Unlike the installed Editions which used your computer's timezone to calculate the scheduled entries you will need to specify your timezone because the servers may or may not be in the same timezone as you.
Step 3: Just like with any other service you need to agree to the terms and conditions to use the LandlordMax Cloud Edition.
Step 4: Select the backed up database from your computer and upload it to the Cloud Edition. If you don't already have a backup of your database you can find the instructions on how to make one in Section 9.1 of the user manual
Step 5: Although our average response time is under 3 business hours please allow up to 1-2 business days for your database to be transferred to the Cloud Edition. We are doing our best to keep response times as quick as possible and sending out invites in phases to avoid large influxes all at once as much as possible. That being said we are transferring databases on a first come first serve basis.
Step 6: Once your database has been transfered to the Cloud Edition you will receive a welcome email asking you to validate yourself and setup a password for your account. Please follow the instructions in the email.
Addendum: Log into your new account and start using the Cloud Edition!
7. Troubleshooting
7.1. Why do I get an "Invalid Image" message?
Images can be encoded into many different formats, which include GIF, JPG, PNG, and many more. LandlordMax supports the main three formats GIF, JPG, and PNG.
7.2. Why can't I see the full screen?
Different computers and devices, especially mobile devices such as iPhones, can have smaller screens in which case you may need to scroll the webpage to see the full webpage.
Please note that most browsers also support the ability to increase and decrease the size of the webpage on your screen which means that if you find the webpage too big or too small you can adjust it in your web browser as well.