3.7. Vendors
The Vendor section of the software is used to store information about both the vendors you used to manage and service your properties as well as the stores, companies, etc. you made purchases from. These can include contractors, suppliers, service providers, utilities, stores, etc.
They are used so that not only can you keep a list of your vendors and tradespeople nearby (including their contact information), but also so that you can generate reports based on vendors (for example you can run a report to see how much you paid Andrew your plumber over the last year, last month, how much you spent at Home Depot, etc.).
STEP 1: Create a new vendor
To create a new Vendor, go to the Vendors menu and click New. Enter the address of the vendor in the upper section of the screen.

STEP 2: Fill the info about the vendor
In the bottom portion of the screen, there are several tabs in which information concerning the Vendor can be recorded.
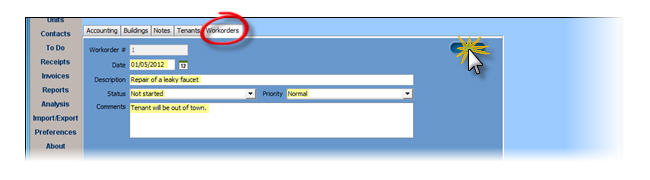
In the tab Accounting, the information are from entries filled in the Accounting system. The lists found in the tabs Buildings, Tenants and Workorders are also automatically generated for you based on the Workorders. Workorders are the only way to associate a Vendor to a Building, Unit, and/or Tenant. What this means is that if you have a Workorder which is linked to your Vendor, the associated, Building, Unit, Tenant, from that Workorder will also be listed under the Buildings and Tenants tabs.
To edit information, click on the tab of your interest select an item and then click View in the right side menu. After the information is edited, click List in the right side menu. When you are happy with all the information you have filled, click Save on the top menu (the button is green when you need to save and returns blue when done). Please note that because the data is cross-referenced, if you edit an Accounting Entry, it will also make the same edit in the Accounting system for that Accounting Entry, and so on.