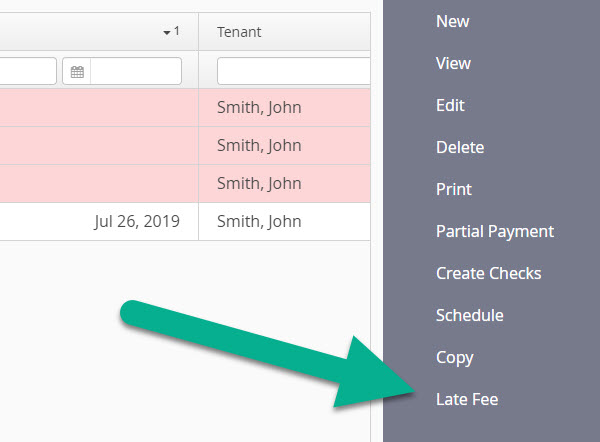
As of today you can now automatically create a Late Fee for your Tenants by clicking on the Late Fee menu option in the main Accounting Entries table. Previously you had to open up the entry and then click on the Late Fee menu option there but as of this week you can now also create the Late Fee from the Accounting Entries table directly.
The Late Fee amount is generated based on the Tenant’s Lease information, specifically it looks for the Lease that matches the Date Due and will then apply the Lease’s Late Fee amount.
Please note that the Late Fee Accounting Entry will have both the Date Paid and Amount Paid empty so that it is an outstanding amount as in most cases you are applying a Late Fee because the rent has not yet been paid.
At the moment Late Fees are applied one Accounting Entry at a time but we are expecting to add the ability to apply Late Fees for multiple Accounting Entries all at once in a single step. That is the ability to select all the late rents you want and then click just once on the Late Fee menu. This effort has already started and we anticipate it will be released very soon.
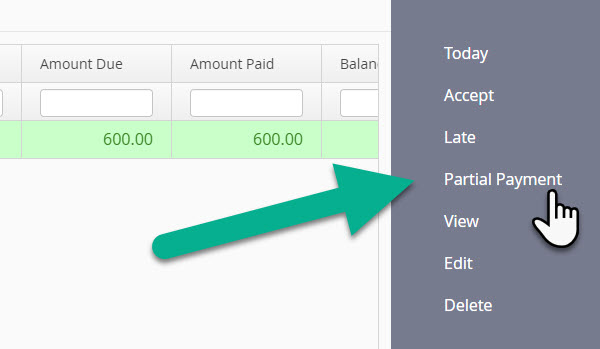
We just added a new Partial Payment menu in Suggested Accounting Entries section of the software, in both the table and individual views. That is to say in the Suggested Accounting Entries table and when you view an individual Suggested Accounting Entry. The screenshot above shows the new Partial Payment menu item from the Suggested Accounting Entries table.
The Partial Payment menu option, much like the Partial Payment option in the main Accounting section, splits up the Suggested Accounting Entry. It creates a new Accounting Entry for the amount that was partially paid and then adjusts the existing Suggested Accounting Entry to show the new outstanding balance still owing.
And for those who prefer a video the new Partial Payment menu option for Suggested Accounting Entries starts around 2:10 into the video. The first portion of the video explains how Partial Payments work in the main Accounting section of the software and the last third is then about how it works for the Suggested Accounting Entries section of the software.
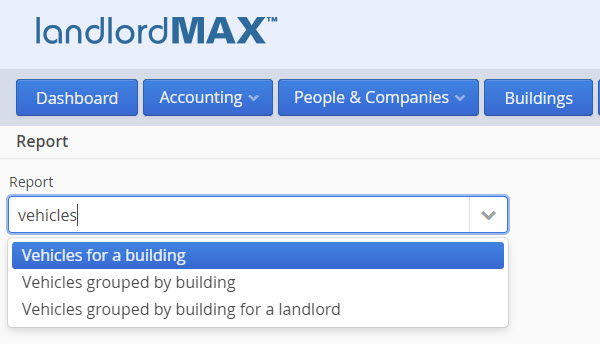
The latest update of LandlordMax from this past weekend included 3 new reports in the software which provide you with the list of tenant vehicles:
Vehicles for a building
Vehicles grouped by building
Vehicles grouped by building for a landlord
These 3 new reports list all the Vehicles listed under the Vehicle SubPanels of your Current Tenants ONLY. In other words it will retrieve all the Vehicles you have stored under your current Tenants and list them for a Building or grouped by Building. The reports include the Tenant’s name, their Unit number, and the Vehicle information such as make model, color, and license plate.
In addition to these new reports we’ve also added a new Tenant Status report option for the Tenant reports. All Tenant reports can include the ability to filter Tenant’s by their Status, specifically if it’s equal to or not equal to a Status such as Current. As of this past weekend you can now also include a filter which will ONLY give you Current Tenant’s. That is to say you no longer have to add the Status and then select Current in the report, you can now force it to only include Current Tenant’s which removes the need to select the Status. The Status field is removed from the Report screen as it’s not needed since you’ve already pre-selected to only include Current Tenants in the report.
That being said we very strongly advice you NOT add this Tenant Status option to the Rent Roll reports as it will lead to unexpected consequences. For example if you run the Rent Roll report for the next upcoming month’s rents and you only include Current Tenant’s then any Tenant that has not yet moved in (started their lease) will NOT appear in the Rent Roll report. In other words all Tenant’s that are moving in next month will NOT appear in the next month’s Rent Roll report as they are NOT Current Tenant’s yet. They will be Current Tenant’s next month but at the time of running the Rent Roll report they are NOT yet be Current Tenants. This can lead to missing rents so it’s important that if you decide to customize your Rent Roll reports to add this that you be exceptional careful and understand the implications before doing so otherwise it can lead to rents that you may otherwise expect to appear not appearing (as correctly reported by the report). So please use the new Tenant Status report element with care.
Some features are more visible and easy to notice while others are more subtle and less visible but yet at the same they can be just as important. In this weekend’s updated we added two new features (along with other new features) that have been highly requested and are very beneficial but are not nearly as noticeable as some of the other features so we’re taking a moment to showcase them here and in our next email newsletter.
Why are they less noticeable and visible? Because by default the system will operate the same, you have to actively seek them out. For the first you need to make it visible, and for the second you need to turn it off in the Settings. If you do nothing then the software will continue to operate as it has always done with no visible change to you.
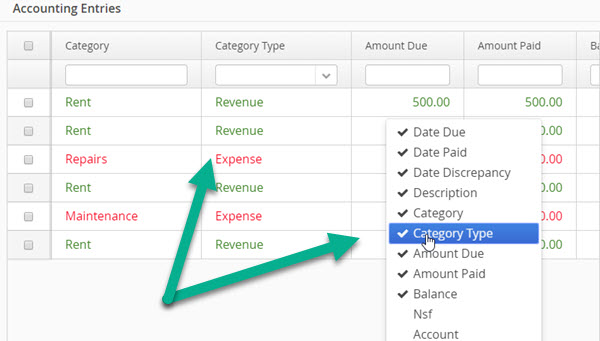
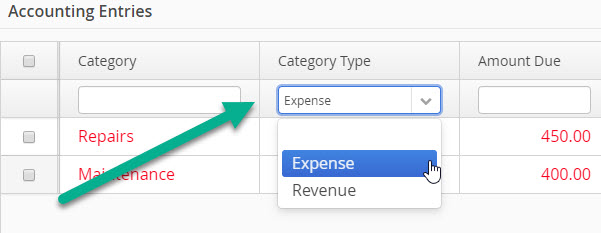
Category Type Column
We just added a new column in all the Accounting Entries tables called “Category Type”. This column will display whether an Accounting Entry is a Revenue or an Expense. By default this column is hidden so you need to right click anywhere on the table and select it from the popup context menu to make the column visible as shown above.
The main goal of this column is to allow you to filter the Accounting Entries to only show either Revenues or Expenses. The classic example is if you’re trying to find a discrepency in your expenses and need to look through your data. If you know the Category then it’s very easy to filter by Category but if you only know it’s an expense then in the past you would’ve needed to run one of the Expense reports to only see the Expense entries. Now with this new column you can filter the accounting data directly in the accounting table to just show expenses which makes it easier to scan for data entry errors.
Again if you do nothing then the software will continue to behave as if nothing has changed but we’ve now also added the ability to turn off a specific set of validation checks if you don’t want or need them. Specifically the validations to confirm that the Tenant and Building and/or Unit match up.
In other words if you select the Tenant (say for an Accounting entry) then the software checks that the Building and/or Unit selected matches up correctly and if it doesn’t it presents you with a confirmation popup to make sure this is what you want to do (as shown above). So for example let’s say you have a Tenant called John Smith that is setup to be living at 555 Main Street. If you create an Accounting Entry and you’ve selected the Tenant John Smith but you’ve selected a Building other than 555 Main Street (say 111 Brown Street) then the software will present you with the above popup notification asking you to confirm that you indeed want to keep the Tenant and Building/Unit (John Smith at 111 Brown Street) even if they don’t match up. There are scenarios where they will often not match up, and for these people turning off that check can be very beneficial.
The software does additional validation checks when you select just a Tenant and Building and/or Unit and these are all grouped under the same one setting. For example the software will automatically select the associated Building for you when you select the Tenant, and vice versa if you select the Building/Unit first (it will then select the Tenant for you). However if you select a Building and no Tenant when there is a Tenant assigned to that Building then the software will by default present you with a popup confirming that you want to proceed. This setting allows you to turn off that popup confirmation.
The popup confirmation is all to avoid and prevent data entry errors. It’s very easy if you’re going very fast to make accidental errors and the software has had these checks in place for over a decade now to prevent data entry errors. And even though it tries to assist you by autofilling the other (Building/Unit when you select a Tenant and vice versa) sometimes people do still override the software or edit previous entries, in which case these validation checks can save you from data entry error headaches. In the majority of cases you want this kind of validation check and confirmation. That being said in those scenarios where you don’t want it, generally where you select one and not the other (for example a Building and not the Tenant) then it can be fairly beneficial to be able to turn off these validation checks. It’s one of those features where almost everyone wants it on but for the small minority that want it off the benefit and value are very high.
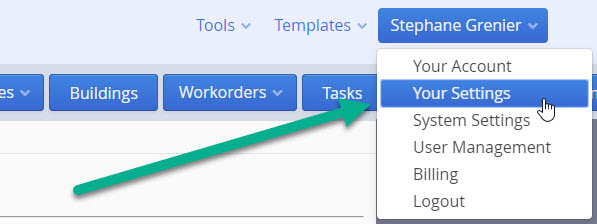
As a result we added a new Setting under “Your Settings” which can be found under your name on the top right corner under your name as shown above.
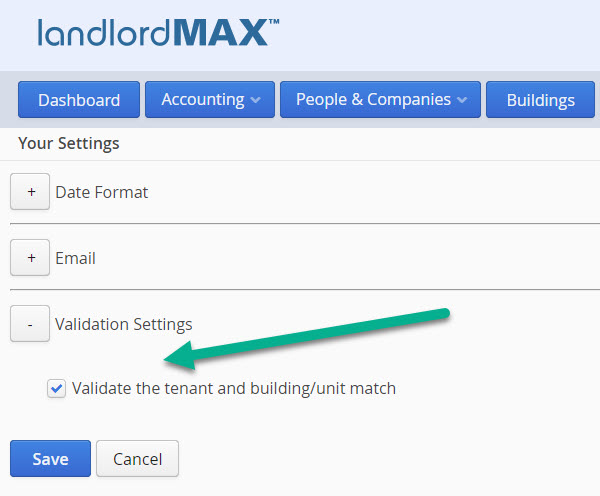
In the “Your Settings” options you will find a new section called Validation Settings with a single setting that allows you to enable or disable this validation confirmation check. In the above screenshot it’s show in Edit Mode (to get to the Edit mode click on the Edit button where the Save and Cancel would otherwise be located). If you turn off this setting then the software will no longer make validation checks between the Tenant and Building/Unit nor present you with any popup confirmations. It’s then up to you to make sure you selected the correct Tenant and Building/Unit combinations. Again the software automatically selects the Building/Unit when you select the Tenant, and vice versa, but if you make any manual edits afterwards, etc. just be aware that the software will no longer check and validate that the Tenant and Building/Unit match. Of course you can turn it all back on by enabling the setting.
Disclaimer:This is a blog and the contents of this blog are for informational purposes only. No content should be construed
as financial, business, personal, or any other type of advice. Commenters, advertisers and linked sites are entirely responsible
for their own content and do not represent the views of myself. All decisions involve risks and results are not guaranteed.
Always do your own research, due diligence, and consult your own professional advisors before making any decision.
This blog (including LandlordMax Software Inc.) assumes no liability with regard to results based on use of information
from this blog. If this blog contains any errors, misrepresentations, or omissions, please contact us or
leave a comment to have the content corrected.