The first thing you have to do when you enter our program is to fill up the basic information about each property, tenant and the lease. You can do so within 5 easy steps or less depending of your property.
STEP 1: Define the Property (Building)
The following YouTube video below demonstrates how to create your first building should you prefer a video tutorial.
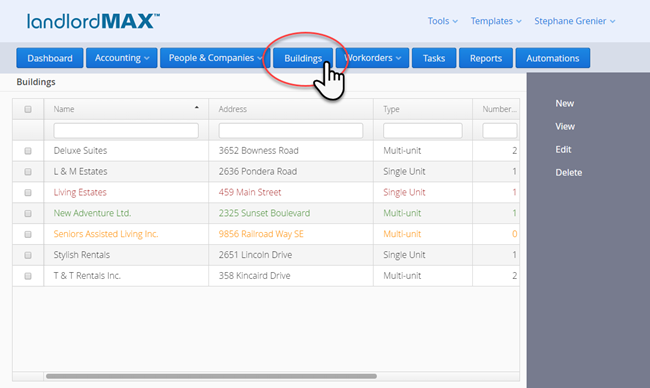
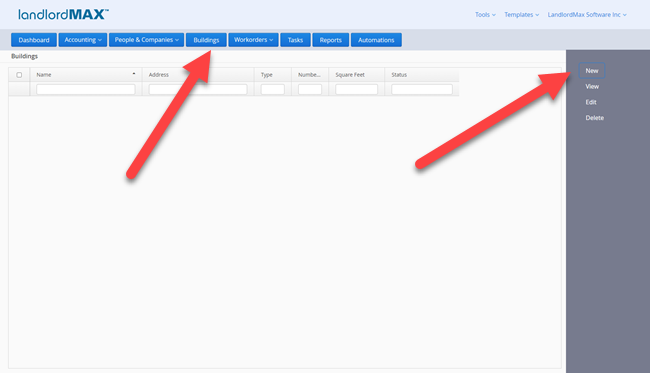
The first step is to get to the Buildings section of the software. To do this click on the Buildings menu item at the top of the screen.
In the Buildings section you then click on the New button.
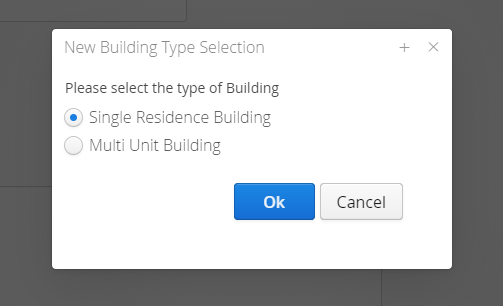
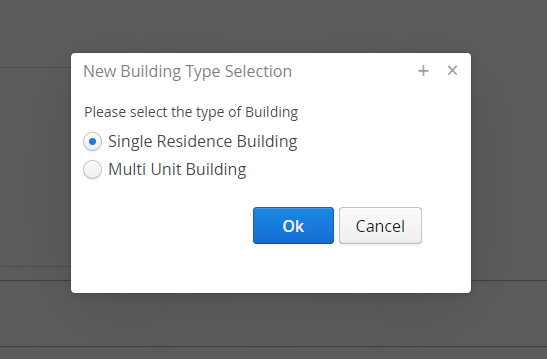
Clicking on the New button will result in a pop-up box asking you to select the type of building as Single Residence Home or Multi-units building.
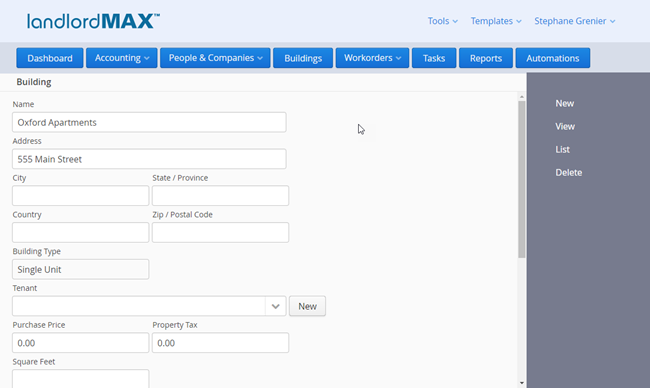
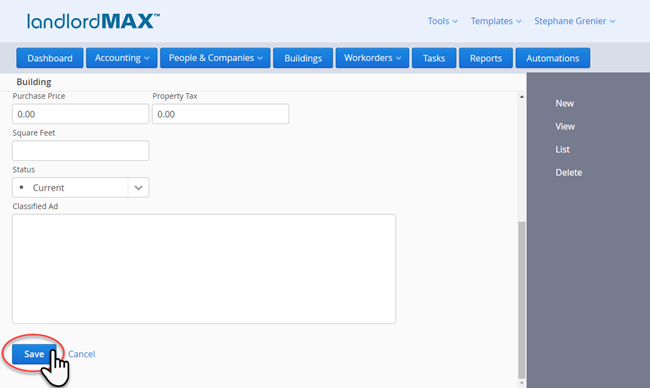
Once presented with the form enter in the building's information as shown below and click on the Save button on the bottom of the form.
STEP 2: Identify the Landlord
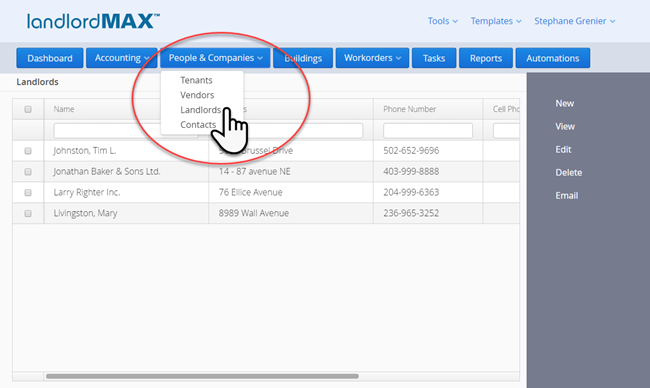
The next step is to create a Landlord. To do this go to the Landlords section by first clicking on the People & Companies menu button in the main menu followed by Landlords.
In the Landlords section you then click New in the menu on the right side.
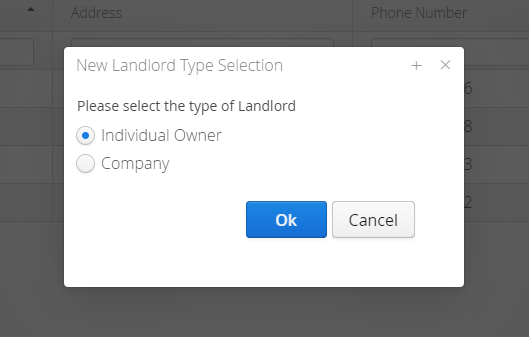
In the pop-up box, select the type of Landlord as Individual owner or Company.
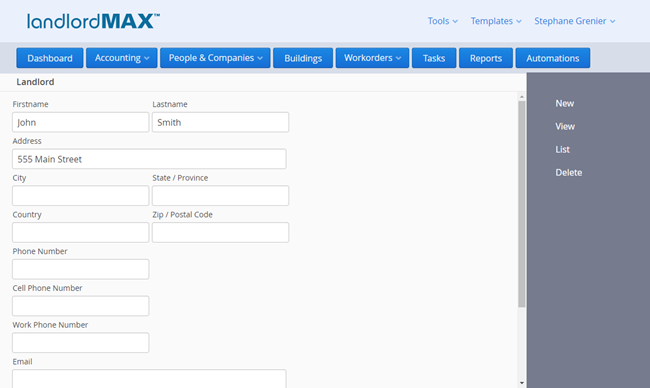
In this example Individual Owner was at which point the name and any other information can be entered and click on the Save button. Please note that you may need to scroll down to see the save button depending on the size of your computer monitor.
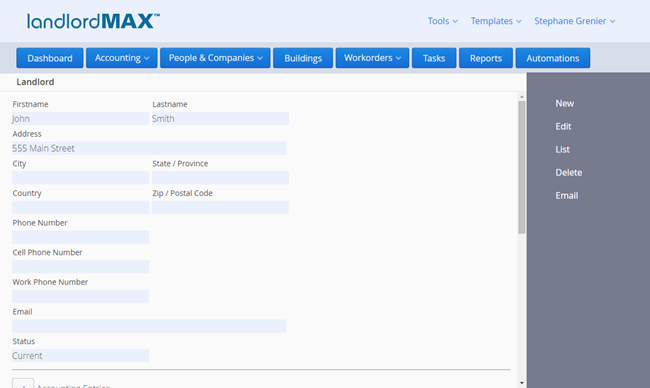
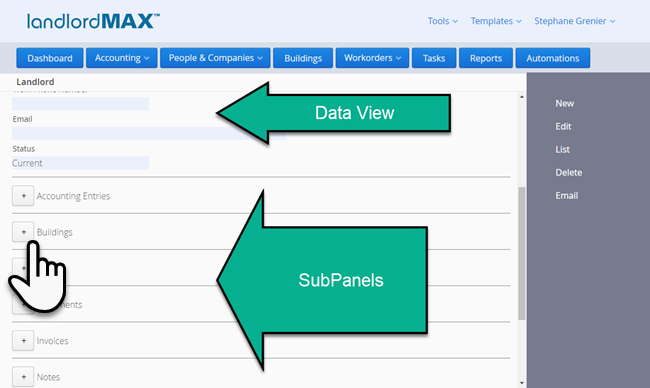
Once you click on the Save button you will be presented with the Data View of the Landlord.
Below the main Data View you will find a list of SubPanels. The SubPanels are lists of all the associated data for the main data, which in this case means that the SubPanels are all the lists of data associated with the Landlord such as the lists of Buildings they own, any Documents associated with the Landlord, and so on. Each SubPanel can be expanded by clicking on the + button and in our case we'll click on the + button for the Buildings.
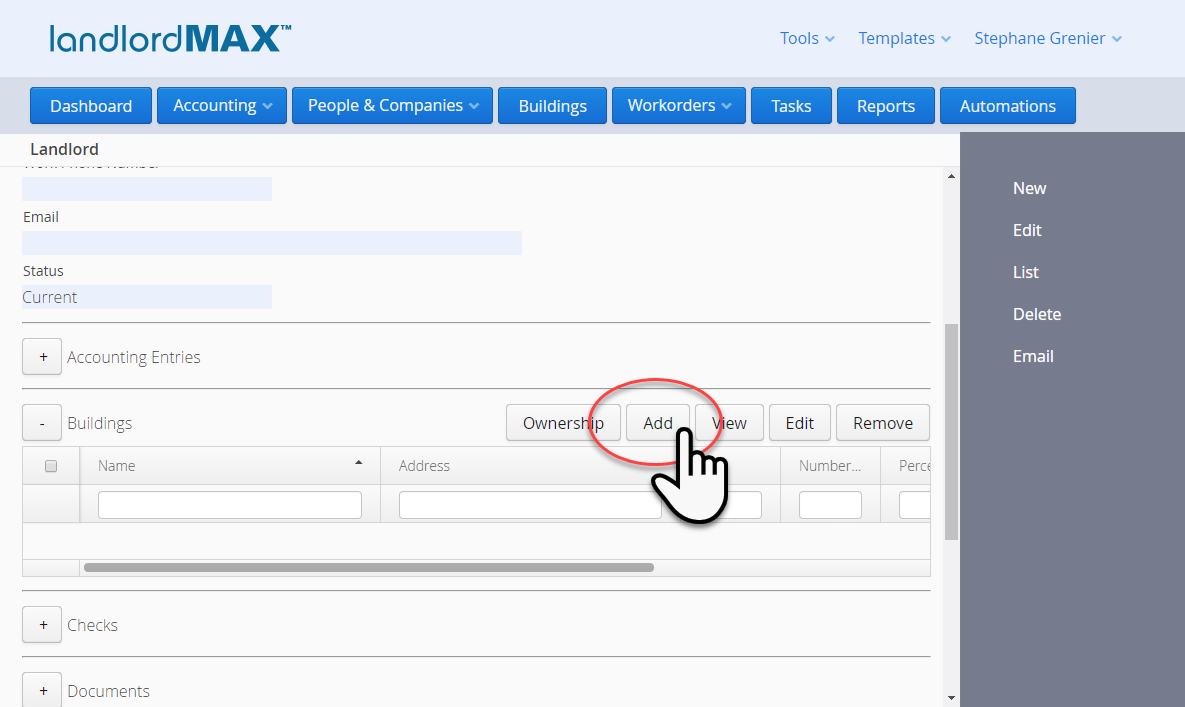
Clicking on the + button will show the list of Buildings that the Landlord owns. In this case since it's a new Landlord the list of Buildings will empty (if you wish to learn more about how the Data Filters work then we recommend this video). Once in the Buildings SubPanel click on the Add button to add a new Building to the Landlord.
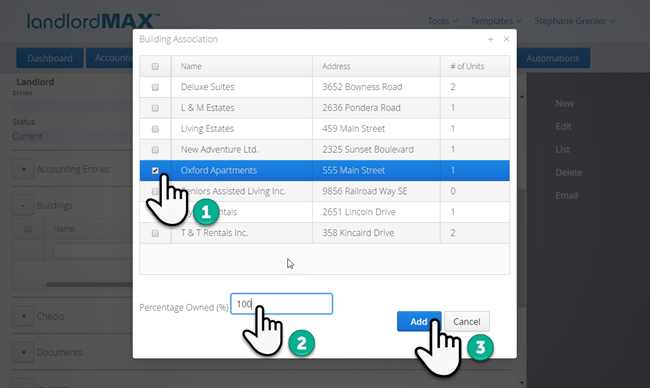
After clicking on the Add button you will be presented with the Building Association popup window. Select the Building, which in this case is the building Oxford Apartments that was created earlier (Step 1). Next enter in the ownership percentage (Step 2). Lastly click on the Add button to add the Building to the Landlord (Step 3).
Now associate a building to the landlord in the tab Building by clicking Add and selecting the building from the drop-down list.
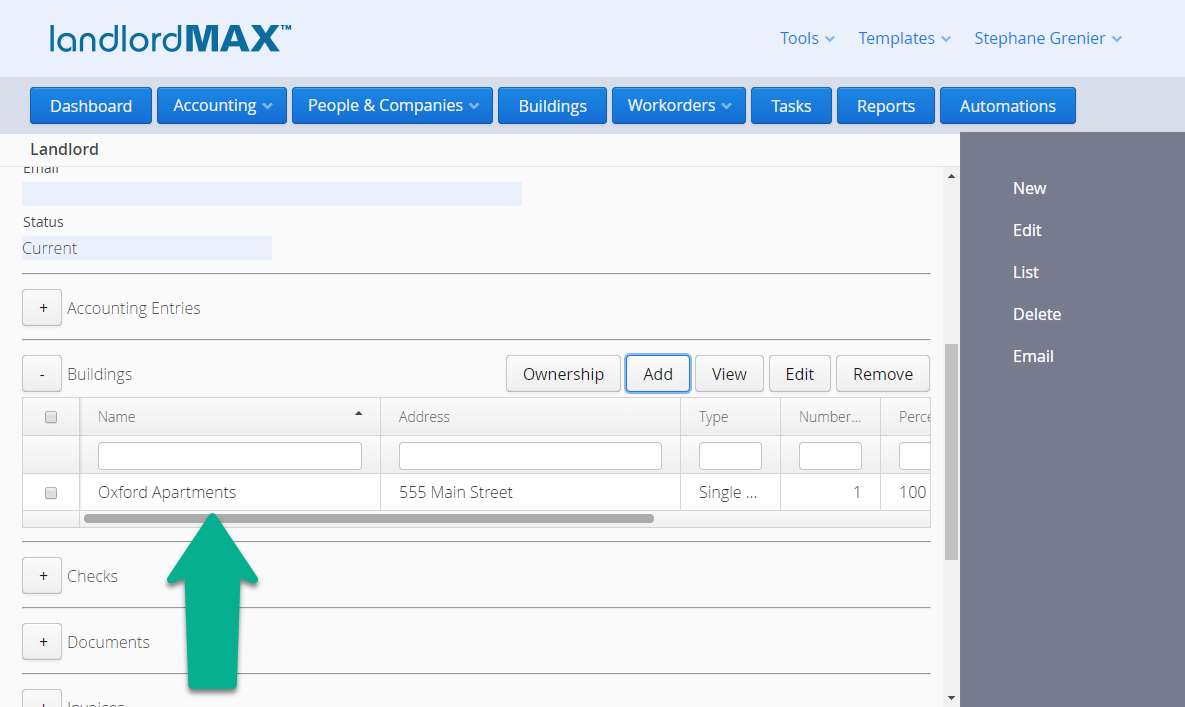
The Landlord and Building have now both been entered and the Landlord owns the Building.
For revenues and expenses you can create two types of entries:
One-time accounting entry for a payment that you will have only once
Scheduled accounting entry for any recurrent payment such as a rent, utitities, etc. that you want to automate
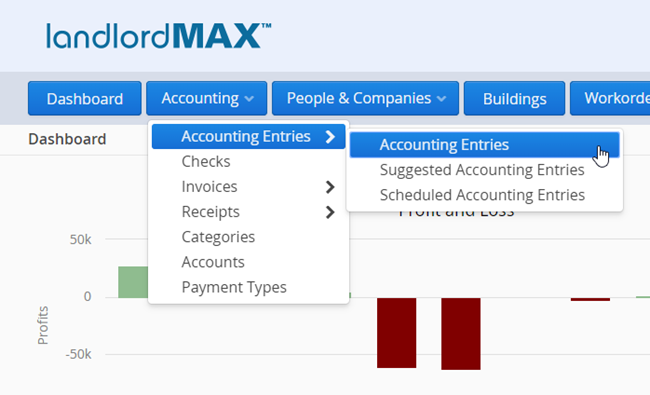
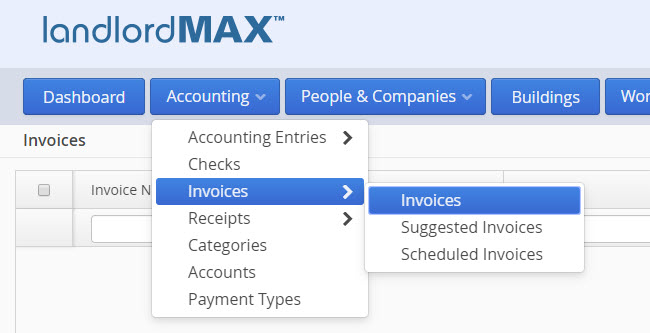
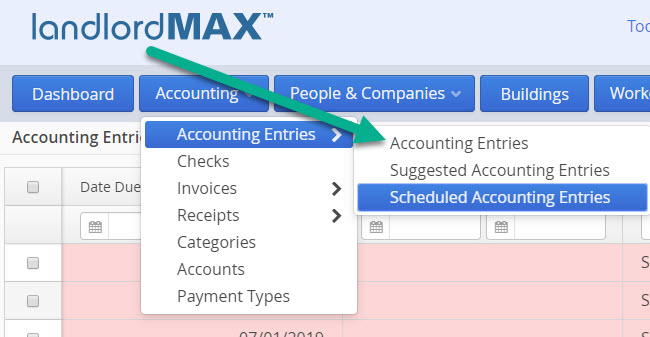
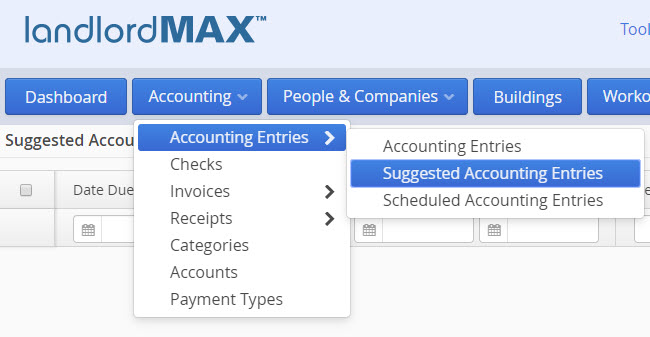
To get to the accounting section you need to go to the accounting menu by clicking on the Accounting menu button. To view all Accounting Entries and/or to enter in a single Accounting Entry select Accounting Entries from the menu. To view and/or edit recurring entries click on the Scheduled Accounting Entries option. The Suggested Accounting Entries menu is to view all suggested entries generated from the scheduled entries, so for example to view a recurring rent payment that is scheduled to be generated each month.
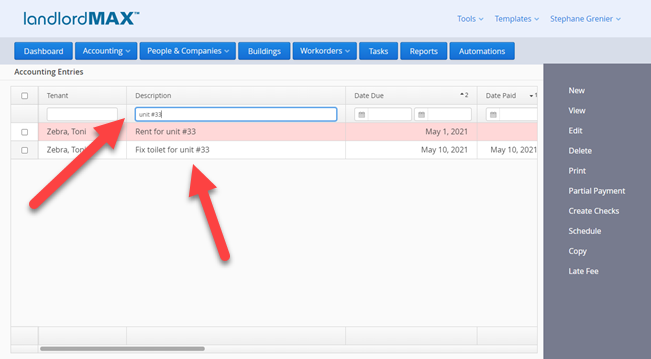
In this section we're going only going to cover entering in a single one-time Accounting Entry, the details about creating recurring entries (that is Scheduled Accounting Entries) can be found in Section 3.3 of the user manual. By default the software will also create scheduled entries for you based on the Leases. More information on this can be found in Section 4.5 of the user manual.
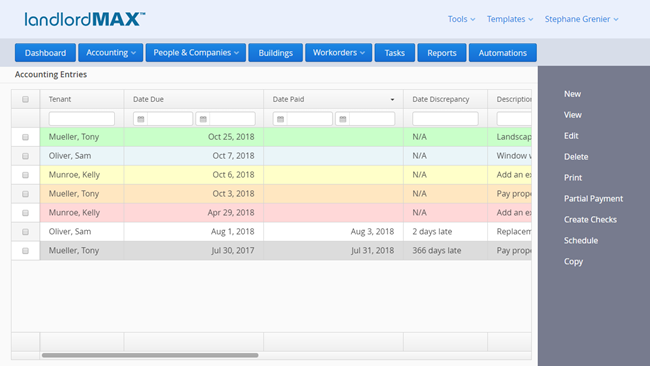
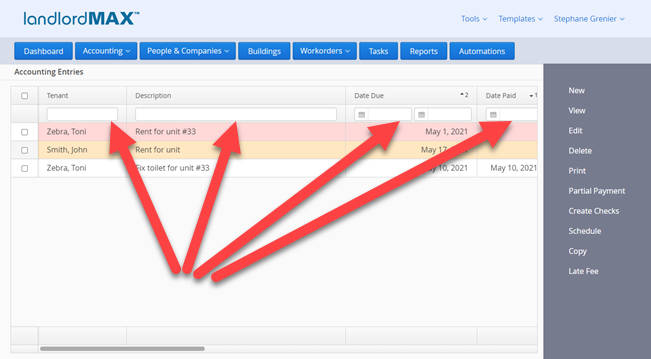
But before we get into details on how to create an Accounting Entry let's first covert the Color Codes in the accounting table. The software comes with 7 Color Codes which can be customized under the System Settings. By default however green represents an Accounting Entry that is due in the future. Blue represents entries that are due today. Yellow, orange, and red represents entries that are late of varying degrees. By default they represent up to 3 days late, up to a week late, and anything later than a week. In addition to the colors you can also set what each color represents in terms of lateness, that is how many days late each color represents. White represents entries that have been paid. And lastly gray represents entries that are NSF.
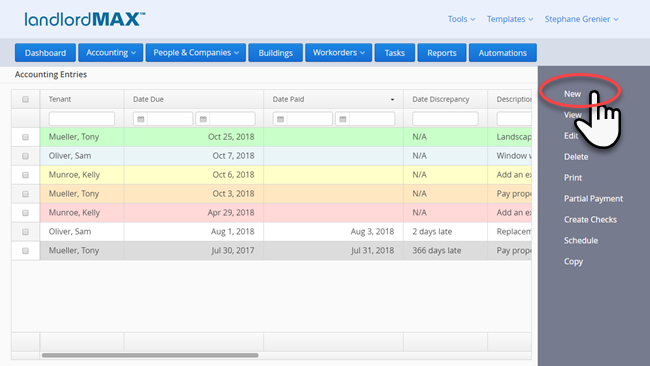
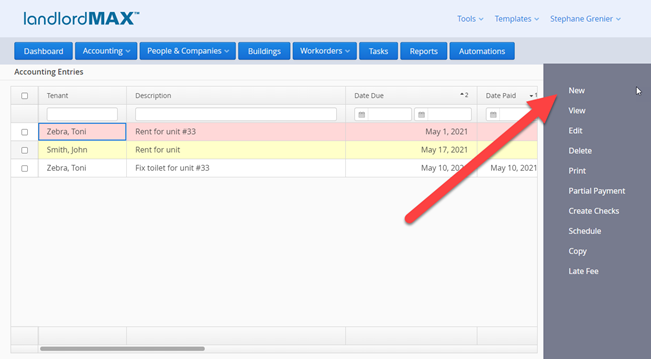
That being said once in the accounting section click on the New action to create a new Accounting Entry.
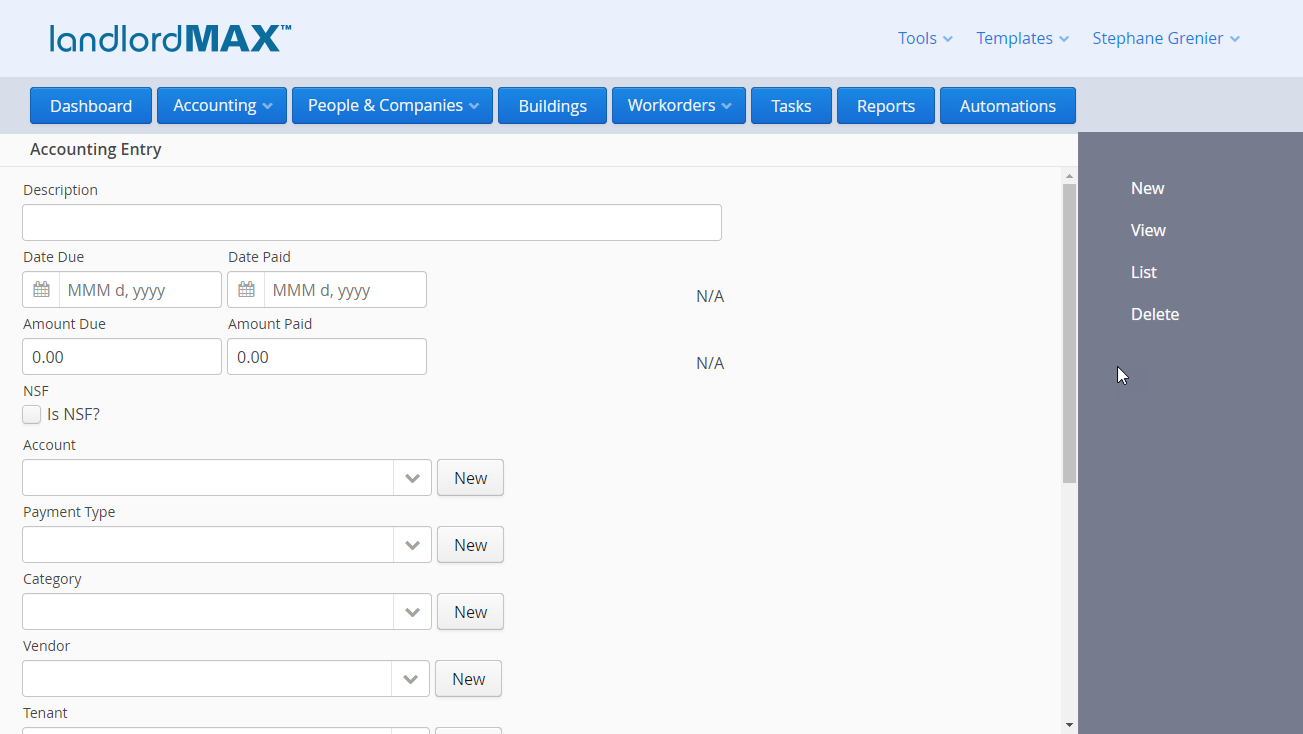
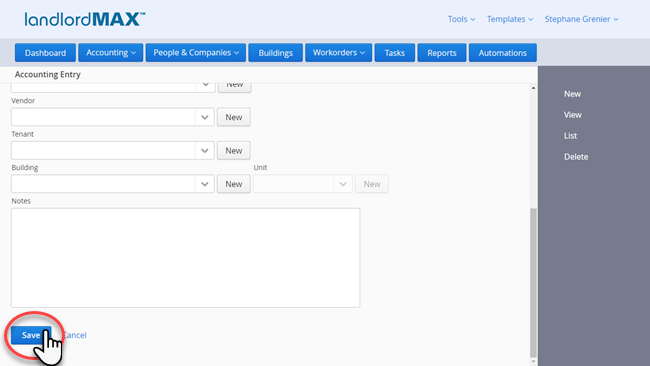
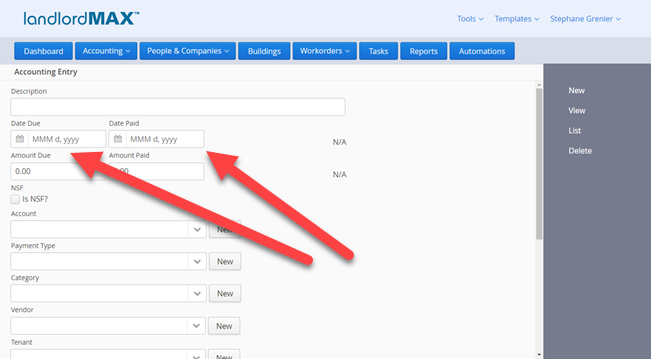
Once you've clicked on the New action you will be presented with the form view for the Accounting Entry at which you can enter in your Accounting Entry data. Please note that all fields are optional.
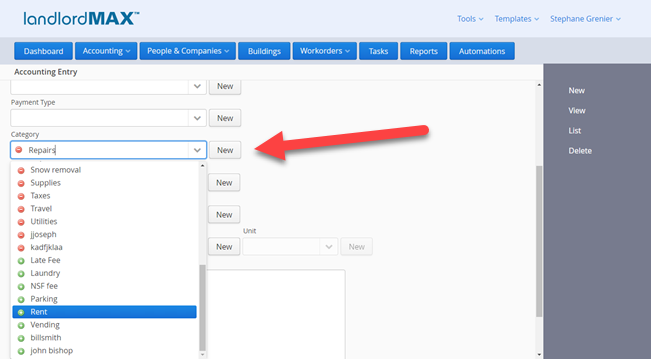
By default the system provides you with default Categories, Payment Types, etc. but if you need to create any new ones you can do so by clicking on the New button to the right of the field.
** IMPORTANT NOTE:Please note that typing in a value in the fields will result in the software trying to find the matching entry, it does NOT create a new value. So for example if you type in Bob Smith for the Tenant then it will search for the Tenant Bob Smith and select them if they exist. If they don't exist then it will NOT create a new Tenant called Bob Smith, to do that you need to either click on the New Button besides the Tenant field to create a new Tenant and then select them.
Once you've entered in all the data you want click on the Save button at the bottom of the form.
After the Accounting Entry has been saved you will be brought to the data view of the Acccounting Entry.
From here you can perform all the different actions found on the right menu such as Schedule to create a recurring entry based on the current entry (Scheduled Entries are explained in Section 3.3 of the user manual). You can Copy an existing entry if it's very similar and you just want to edit some fields. You can click on Create Check to create a check based on the current entry, click on Print to print it, and so on.
As well you can filter the data in the tables by any column using the Data Filters. The system will filter the data as you type in the values in the column's header. So for example if you type in Bob in the column header for the Tenant column the table will only show entries that have "Bob" in the Tenant's name (please note that in the example for "Bob" it will include anything with "bob" so in this case "Amy and Bob" would be included). The following YouTube video shows how to use and customize the tables as well as how to filter the data to what you want.
1.3. Invoices and Receipts
Invoices and Receipts should be viewed as documents rather than accounting data because for example you could create an Invoice (and Receipt) for a rent check and then that check could bounce. In this case you still need to keep the record of both the Invoice and Receipt for legal reasons such as if you need to go to court to evict the Tenant. As a result you should not be editing the Invoice and Receipt after they have been provided to the Tenant. In fact that same Tenant could pay you again with another bounced check at which point you have another set of Invoices and Receipts before they finally pay you. In other words you could have 1, 2, 3, or more Invoices and Receipts for the same rent and if that's the case you don't want the system to create multiple rent payment entries in the accounting data because you have multiple Invoices and Receipts for the same rent. As a result the software does NOT use the Invoice and Receipt data as accounting data, nor is it used for the accounting reports. The Receipts and Invoices should instead be viewed as documents.
In addition to the above some people don't need Invoices and Receipts and as such we do not want to force everyone to use them if they aren't needed for some people. Meaning that Invoices and Receipts are completely optional.
By default when you crease a Lease the software will also automatically create Scheduled Invoices and Receipts for you (this feature can be turned off).
All tables can be searched/filtered so that you can limit the number of entries in your view list to only those that you're interested in. You can find searches/filters in the Accounting, Workorders, Buildings, Units, Contacts, Receipts, and Invoices sections of the software.
** Please note that searches are reset on page load because it is very easy to forget that you have set the search in a specific way so if you're looking for a specific item such as an Accounting Entry and it seems to have disappeared, check your search fields before you panic. And of course you can always reload the page to clear the searches.
The video below covers both how to completely customize the tables in addition to how to search on any column. As in it shows you how select which columns appear in the tables, in what order they appear, how to sort the columns, and of course how to search for data within the tables.
SECTION 1: Date Searches
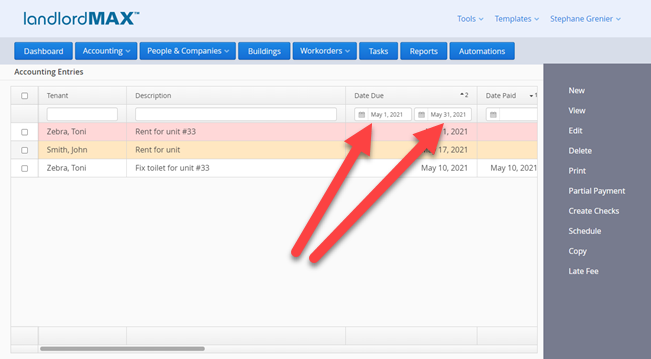
Date searches can be used to search for a range of dates, with the most common search being showing all the entries for a specific month. As a result they have two fields, the first being the Start Date and the other being the End Date.
If you want to search for all entries due in May 2021 then you would enter in May 1, 2021 in the first field and May 31, 2021 in the second field as shownn in the screenshot above.
If you want to search for all entries after today then you would simply just enter in today's date in the Start Date field (the first field) and it would show all entries for today and later (as there is no End Date). Similarly if you want to search for all entries before today you would enter in today's date in the End Date search field.
SECTION 2: Text Searches
Text searches will match any part of the text in the search field. Meaning for example if you search for "Bob" will list all entries that have "Bob" anywhere in the column. This means that "Bob Smith" would match but so too would "Apple Bob", "John Bobbit" as they both contains "Bob". The search is also case insensitive meaning that if you were ever to make a typo and enter in "bob" it will also find "Bob".
SECTION 3: Number Searches
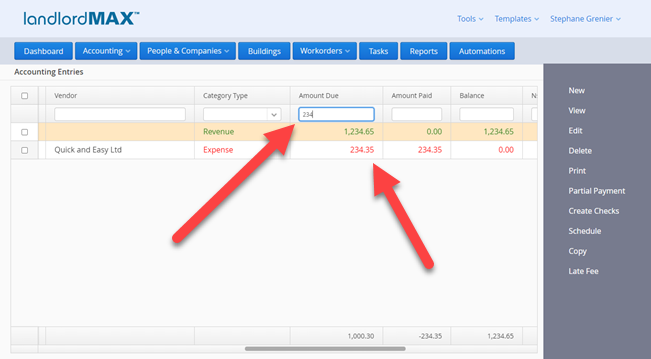
Number searches will match any part of the number in the search field. Meaning for example if you search for "234" will list all entries that have "234" anywhere in the column. This means that "234" would match but so too would "234.00", "1234.00", and "234.65" as they all contains "234".
SECTION 3: Special Searches
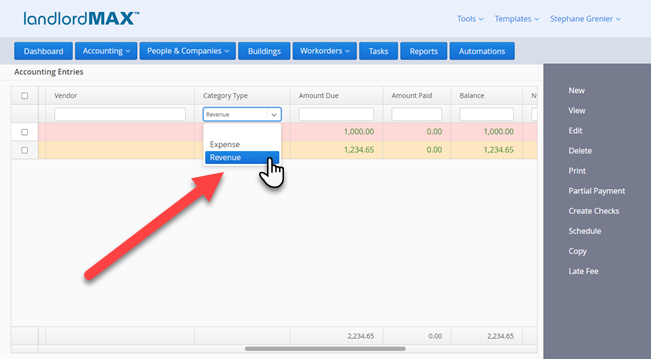
Some columns have what are called special/select searches where you are presented a combobox rather than a field to type in such as the Category Type in the Accounting Entries tables. These are generally only presented when the list of available options is limited to a few values and it's more convenience to just quickly select from a list.
1.5. Reports
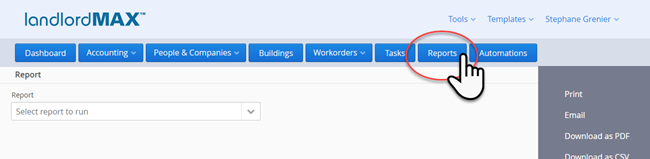
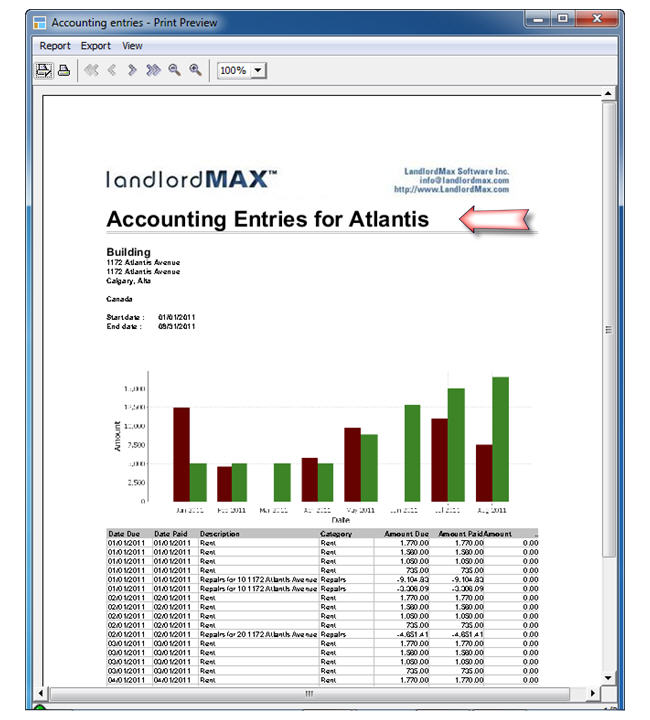
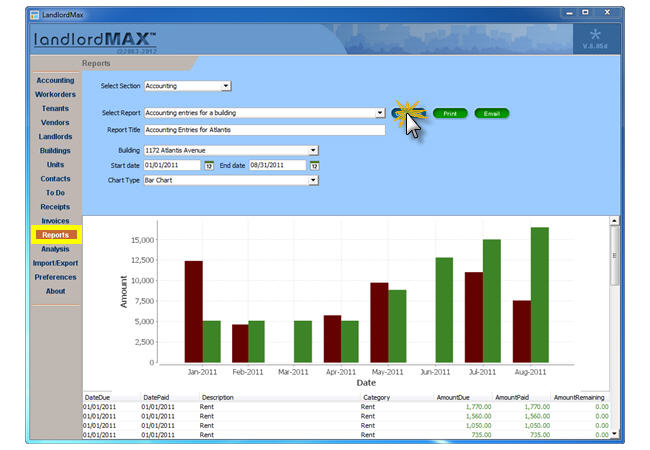
Once you have gathered all the information, you want to be able to see what's happening, when rents are due, which rents are late, how well your properties are doing, prepare for your taxes and so on. To do so you will produce reports by clicking on Reports in the menu.
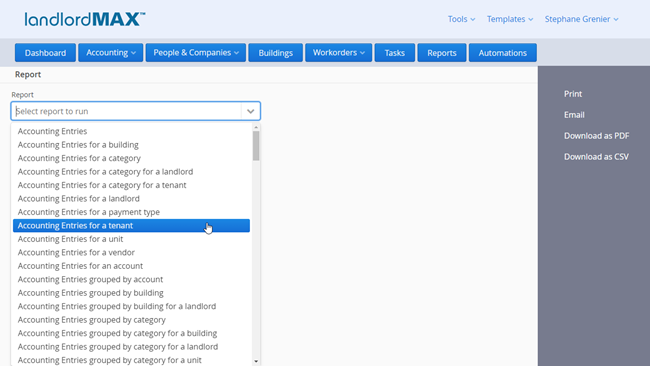
The first thing you'll want to do is select which report you want to run. Please note that you can also type in the report name and the software will automatically filter out only reports with that name. So for example if you only want reports that have the word "Tenant" in the report name then you can just type in Tenant and only reports such as "Accounting entries for a tenant", etc. will be included.
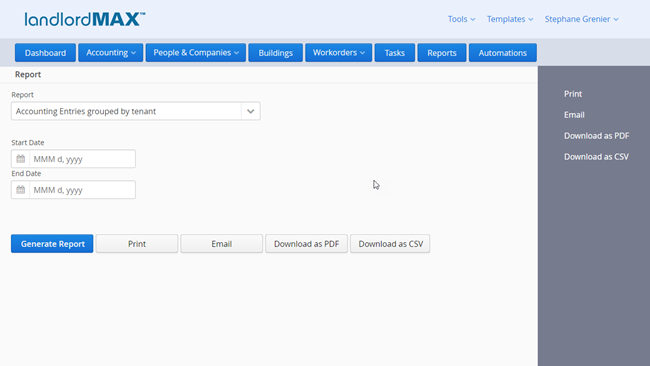
Once you select a report you will be presented with that reports specific fields. In the following screenshot the report "Accounting entries grouped by tenants" was selected. There are over 150 different reports that come with the software by default but you can also create your own custom reports as well as customize any of the existing reports, meaning that the list of reports is completely up to you. Please note that customizing reports does require some html/css technical knowledge and that we also offer consulting services to help you create custom reports specific for you. The details on how to create your own custom reports are available in Section 6.
*Please note that if you set a Start and/or End Date for any of the accounting reports that by default the software will only include accounting entries that have been paid (Date Paid) between those two dates (Start and End Dates). Otherwise if it included entries on when they were due, a rent for December 1st that was paid 45 days late, in January of the following year, could be reported as income in the wrong calendar year for a report generated for tax purposes. The same is true for a corporation with a non-calendar fiscal year. You can customize this behavior by editing any of the existing reports or creating your own custom reports.
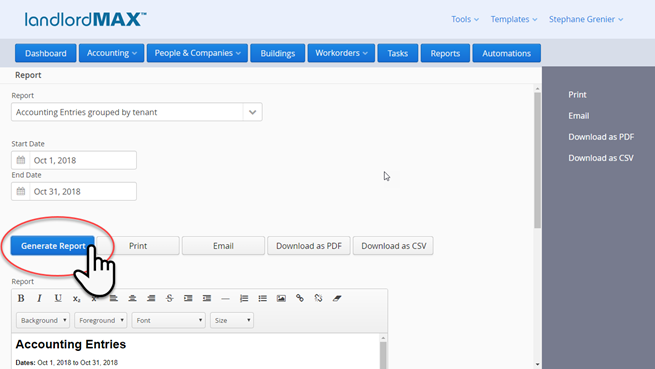
Once you have entered in the values you want for report click on the Generate button.
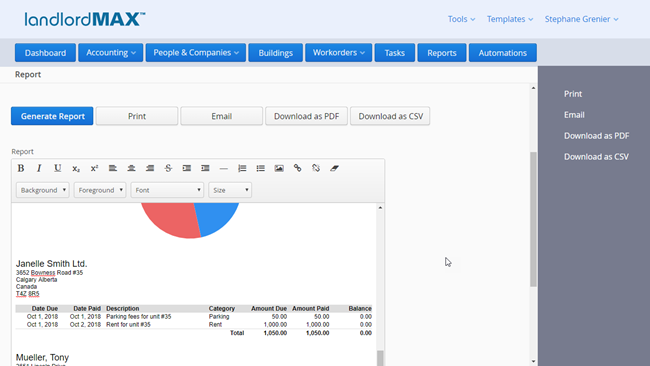
You can then Print, Email, or Download the report, depending on your needs. As well, all reports can be downloaded to PDF of CSV files.
*Please note that you can edit the report before you print, email, or download it (except for the CSV download). That being said please note that the report window is a word processor and so if you edit a value it will NOT recalculate the totals and so on.
*Please note that there are two scroll windows, one for the report screen and one for the word processor in which the report resides.
2. Accounting Workarea
2.1. Introduction
LandlordMax allows you to keep track of all your expenses and revenues through Accounting Entries. You can then generate reports based on those Accounting Entries to show you exactly where your finances are. Above this, you can also record amounts that are owed and so on so that you can generate reports such as "Late rents" which will allow you to better manage and collect your late rents.
In detail, an Accounting Entry is any revenues or expenses you wish to record. For examples, expenses associated with a building include a new roof, school taxes, mowing the lawn, mortgage, management fees, etc. Revenues are of course rents, parking licenses, laundry machines, etc. For clarity, all revenues are displayed in green and all expenses are displayed in red in the program.
All tables can be searched/filtered so that you can limit the number of entries in your view list to only those that you're interested in. You can find searches/filters in the Accounting, Workorders, Buildings, Units, Contacts, Receipts, and Invoices sections of the software.
** Please note that searches are reset on page load because it is very easy to forget that you have set the search in a specific way so if you're looking for a specific item such as an Accounting Entry and it seems to have disappeared, check your search fields before you panic. And of course you can always reload the page to clear the searches.
The video below covers both how to completely customize the tables in addition to how to search on any column. As in it shows you how select which columns appear in the tables, in what order they appear, how to sort the columns, and of course how to search for data within the tables.
SECTION 1: Date Searches
Date searches can be used to search for a range of dates, with the most common search being showing all the entries for a specific month. As a result they have two fields, the first being the Start Date and the other being the End Date.
If you want to search for all entries due in May 2021 then you would enter in May 1, 2021 in the first field and May 31, 2021 in the second field as shownn in the screenshot above.
If you want to search for all entries after today then you would simply just enter in today's date in the Start Date field (the first field) and it would show all entries for today and later (as there is no End Date). Similarly if you want to search for all entries before today you would enter in today's date in the End Date search field.
SECTION 2: Text Searches
Text searches will match any part of the text in the search field. Meaning for example if you search for "Bob" will list all entries that have "Bob" anywhere in the column. This means that "Bob Smith" would match but so too would "Apple Bob", "John Bobbit" as they both contains "Bob". The search is also case insensitive meaning that if you were ever to make a typo and enter in "bob" it will also find "Bob".
SECTION 3: Number Searches
Number searches will match any part of the number in the search field. Meaning for example if you search for "234" will list all entries that have "234" anywhere in the column. This means that "234" would match but so too would "234.00", "1234.00", and "234.65" as they all contains "234".
SECTION 3: Special Searches
Some columns have what are called special/select searches where you are presented a combobox rather than a field to type in such as the Category Type in the Accounting Entries tables. These are generally only presented when the list of available options is limited to a few values and it's more convenience to just quickly select from a list.
2.3. Creating a New One-Time Accounting Entry
To create a new one-time Accounting Entry, go in the Accounting menu and click New.
In the new window you will need to enter information about the new Accounting Entry.
STEP 1: Enter Dates
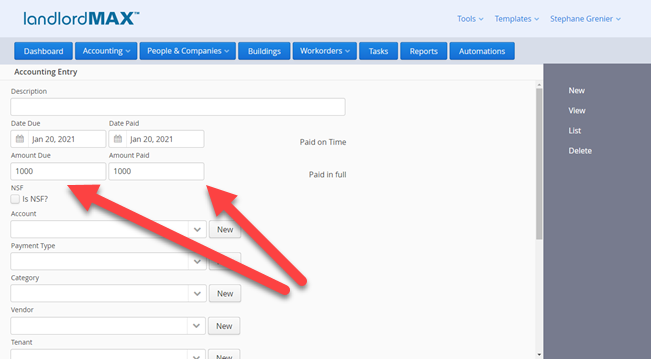
The date fields can be entered manually or with the popup calendar. The popup calendar is available by clicking on the icon on the left side of the date fields. If the dates are manually entered they must be formatted according to how their displayed (which can be set in "Your Settings"). In example screenshot the date format is MMM d, yyyy (for example Jan 20, 2021).
Along with standard Accounting Entries, you may also want to create entries for future payments or expenses. In these cases, you will enter the appropriate Date Due for the payment and omit the Date Paid.
The Date Discrepancy in the Accounting Entry is the difference between the Date Due and the Date Paid and will be calculated automatically by the program. This value is especially important for some people in the calculation of late fees. In the above screenshot the values are shown as N/A as no dates have yet been entered.
STEP 2: Enter Payment
Similar to the Date Due, the Amount Due field is really mainly there for informational purposes such as when a Tenant hasn't paid their rent so that you know how much is due for the rent.
For Partial Payments you will want to separate the amount due into two separate Accounting Entries by clicking on the "Partial" button on the right menu (this cannot be done while creating a new Accounting Entry, it can only be done on existing Accounting Entries.
So for example if you have a rent of $1000 due on Dec 1st where the tenant pays you $600 on Dec 1st and $400 on Dec 12th, you will need to create two separate Accounting Entries, one for each payment received (similar as you will have two line items in your bank statements, one for each payment made - regardless of when everything was due). This is all automatically done for you by the Partial button on the right menu.
In other words you have:
Accounting Entry 1
Accounting Entry 2
Date Due
Dec 1
Dec 1
Date Paid
Dec 1
Dec 12
Amount Due
$600
$400
Amount Paid
$600
$400
Amount Remaining
$0
$0
If the second payment hasn't yet been made (for example it's just Dec 10th and the Dec 12th payment hasn't yet been made), then the Date Paid and Amount Paid would remain empty for the second Accounting Entry, meaning it would be considered a late Accounting Entry.
For non-payments you can select the NSF checkbox. It can happen that a tenant never pays a rent due or another bill he owes to the property owners. If you do not count on them ever paying the amount, then we do recommend you to keep a record of the Accounting Entry that was never paid should you ever need to go to court, etc. Checking the NSF checkbox tells the software that the amount will never be paid and it is no longer in the late accounting entries list. As well the software will then close the Accounting Entry so that you no longer see it with an Amount Remaining to be paid.
Step 3: Select the Account
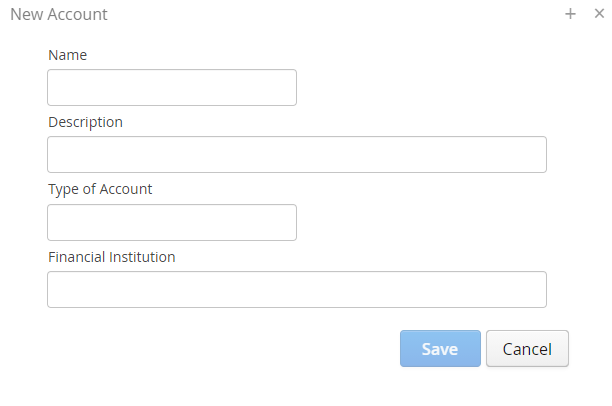
You may have more than one Account where to process a payment (an Account can be a financial institution, it can be a cash account, it can be as simple as a budgetary account, and so on). By clicking on the New button next to this field, you can create as many Accounts as you need (you can also manage the Accounts in the Accounts section of the software). When you click on the New button pop-up window will open where you will enter the specific information about the Account.
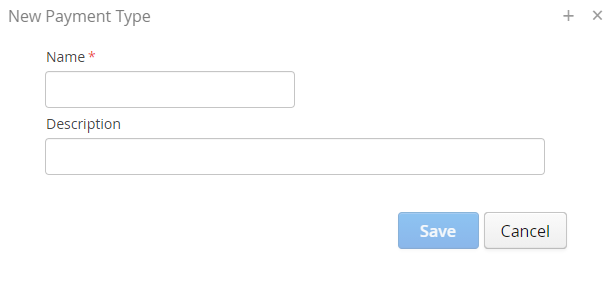
Step 4: Select the Payment Type
Next you can record the Payment Type you will deal with. In the dropped down list of this field you will find several options to choose from such as cash, check, credit card, etc. You may as well create a new type of payment if you wish by clicking on the New button on the right of the field which will then automatically appear in the list. Similarly to Accounts you can manage Payment Types in the Payment Types section of the software.
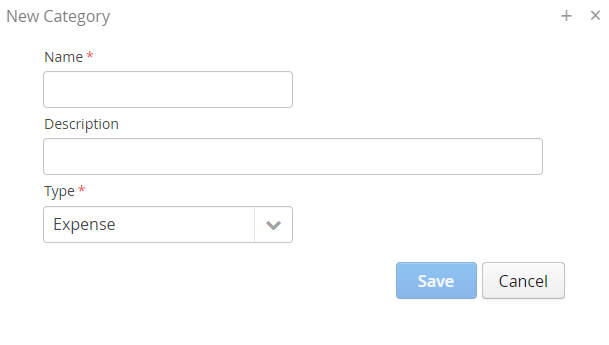
STEP 5: Select the Category
LandlordMax has some pre-created default Categories which includes revenues and expenses such as rent, insurance, repairs, etc from which you can select. You can however also create as many custom Categories as you need or wish. Categories can then be managed in the Categories section of the software.
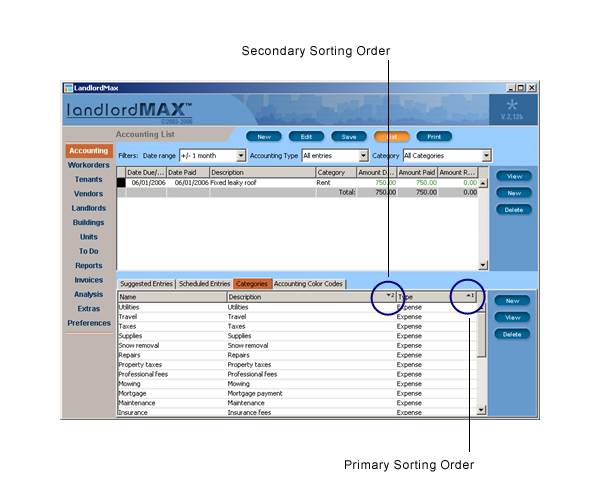
Categories will grouped together and color coded, so that all expenses and all revenue categories are sequential. This will help facilitate searches of specific entries among all the others via the reports and filters. Please note that if you start to type in the name of the Category in the field it will automatically find it and select it for you. In other words it will limit the list of Categories to what matches what you've typed in.
Again if there is no suitable category to select from and you wish to create a new one, you can just click on the New button to the right of the field to immediately create a new one to use.
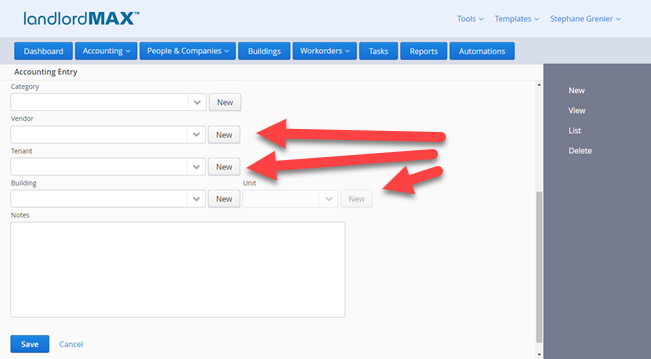
STEP 6: Select the Vendor, Tenant, Building, and/or Unit associated with the payment
The last step is to associate the Accounting Entry to a Vendor, a Tenant, a Building, and/or a Unit. All fields are completely optional. And similar to the categories, this will help group together related Accounting Entries for the reports such as trying to run the Accounting entries for a building report.
By clicking on the arrow of the respective field, you will find a list of the Vendors, Tenants, Buildings, and/or Units that you have already recorded in your database. If the one you are looking for is missing you can again use the New button on the right to create a new entry on the spot. Please note however that the popup will be limited in fields compared to the full view. That is to say for example that the new Tenant popup will be limited compared to when you go to the Tenant's screen.
* To enable the Unit field, a multi-unit Building must first be selected.
2.4. Creating a New Scheduled Accounting Entry
Scheduled Accounting Entries are where you define your recurring transactions such as rents, utility bills, mortgage payments, and so on. If you have just a single one time Accounting Entry (transaction) such as fixing a toilet then you would just create a single Accounting Entry. Scheduled Accounting Entries are only for recurring transactions, including transactions such as utilities where the amount can change every cycle (week, month, etc.).
The Accounting Entries Section is divided into 3 parts.
Accounting Entries— The list of all your transactions (Accounting Entries).
Suggested Accounting Entries— The list of entries that have been generated for you that are waiting your approval before going into the main Accounting Entries table
Scheduled Accounting Entries— The list of definitions for your recurring Accounting Entries.
For recurring entries the process is to first define the Scheduled Accounting Entry, that is to say when it will recur. So for example if you have a rent that's due on the 1st of each month then you would first create a Scheduled Accounting Entry to say that you want a rent due every month on the 1st. The software will then generate Suggested Accounting Entries for you to approve. The best way to view the Suggested Accounting Entries is as a placeholder before they are put in the main Accounting Entries table so that you have a chance to approve and/or edit them.
A classic example of why you want an intermediate placeholder first is late rents by tenants, or even worse unpaid rents, which means that rents due on the May 1st in fact not be paid on the May 1st but maybe May 2, 3, 4, and so on. By putting them in a placeholder for your approval (Suggested Accounting Entries) you can then confirm and approve which rents are paid on time, which are late, and so on.
STEP 1: Schedule the Entry
The first step is to create the Scheduled Accounting Entries for the recurring transactions. Please note that by default the software will create all the rent Scheduled Accounting Entries for you based on the Leases you enter saving you the effort of creating them for all your rents.
There are two ways to create Scheduled Accounting Entries with the most common being going to the Scheduled Accounting Entries menu (as shown in the screnshot above) and then clicking on the New option to create a new Scheduled Accounting Entry. Alternatively you can select an existing Accounting Entry and click on the Schedule menu option on the right side. For this section we will cover the first option where you create a new Scheduled Accounting Entry from the Scheduled Accounting Entry section of the software.
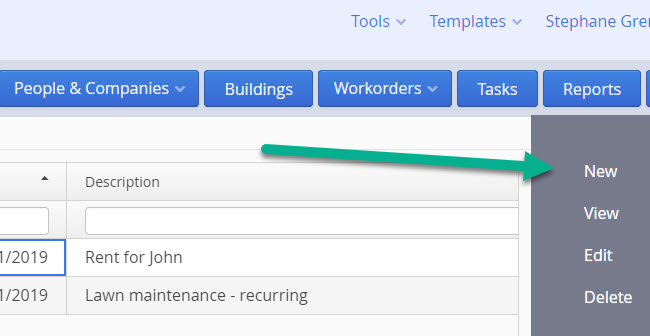
To create a new Scheduled Accounting Entry you first need to click on the New action on the top right of the screen as shown above.
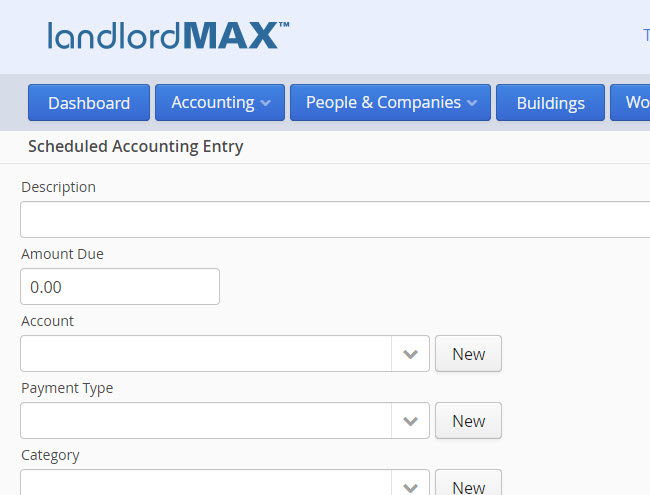
The new Scheduled Accounting Entry form can be divided up into two logical sections. The top section is where you enter in the accounting data such as the amount, the description and so on. This is what you want to appear in the final Accounting Entry after it's been approved and processed.
** TIP:Keep in mind that you can edit the entry before it's approved so it's best to view the values in the Scheduled Accounting Entry as the defaults, that is the most likely values. So for example if it's a rent and the tenant generally pays by check then set the Payment Method to be check and should they decide one time to pay by Cash then you can just edit the Payment Method for that entry.
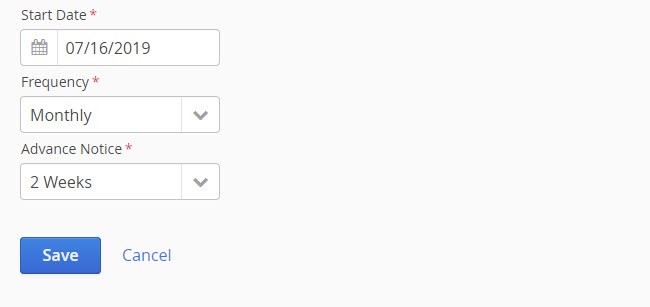
The bottom portion of the form is where you schedule when the Accounting Entry will recur (first created as a Suggested Accounting Entry to be approved). Specifically you need to set three values:
Start Date - The date on which the first recurring Accounting Entry will be created.
Frequency - How often the recurring Accounting Entry will recur.
Advance Notice - How much far ahead of time will the recurring entry be created.
So for example if you create a Scheduled Accounting Entry with a Start Date of Jan 1, 2019, with a Frequency of 1 month and an Advance Notice of 2 weeks then the software will create the first Suggested Accounting Entry for you to approve for Jan 1, 2019 two weeks before it's due (2 week Advance Notice), meaning it will be created on Dec 18, 2018 (2 weeks before Jan 1, 2019) and it will be marked as due and paid on Jan 1, 2019. You can then either accept it as is or modify it if needed before accepting it. Then the next month the software will again create another Suggested Accounting Entry for Feb 1, 2019 two weeks ahead of time on Jan 18, 2019 (again 2 week Advance Notice) for you to approve or modify before accepting. The software will continue to create Suggested Accounting Entries for you until the Scheduled Accounting Entry is deleted.
Please note that although you can modify almost any value in the software it is not possible to modify the scheduling values in the Scheduled Accounting Entries due to all the possible scheduling and data conflicts. Therefore if you need to edit the scheduling values for the Scheduled Accounting Entries you will need to delete the existing Scheduled Accounting Entry and then create a new Scheduled Accounting Entry.
STEP 2: Approve the Entry
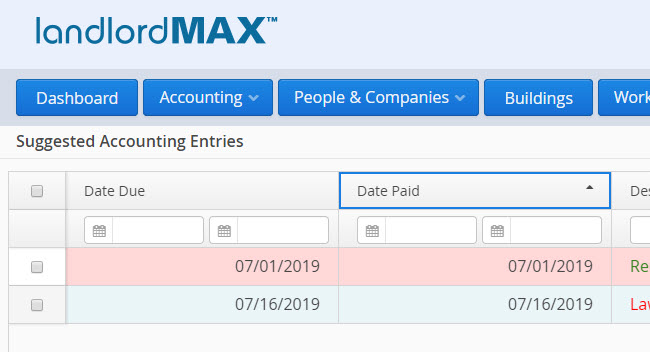
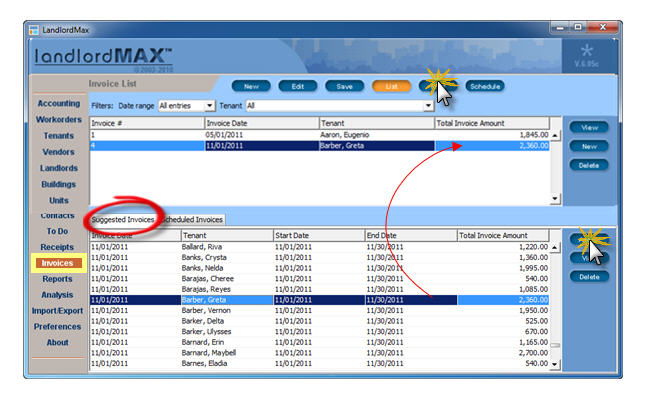
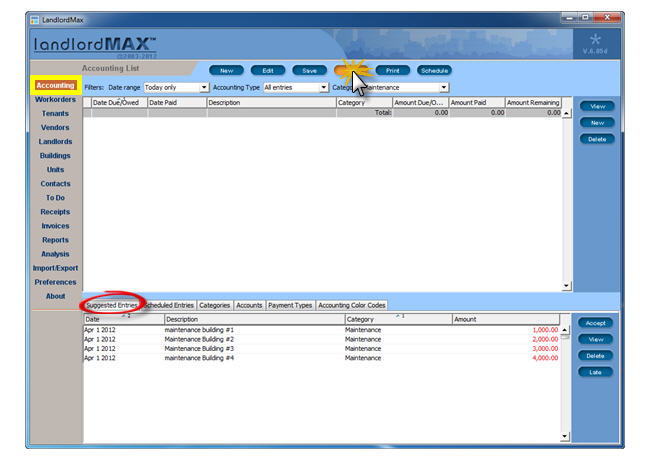
As described just above in Step 1 once you have created a Scheduled Accounting Entry the software will then generate Suggested Accounting Entries based on the Scheduled Accounting Entries for you to approve. You can view the list of Suggested Accounting Entries for you to approve by going to the Suggested Accounting Entries section of the software as shown above.
The Suggested Accounting Entries table as shown above lists all the Suggested Accounting Entries waiting for your approval. In the example above there are two Suggested Accounting Entries waiting for approval. The first one is red meaning that it is currently late and the other is blue meaning that it's due today. You can of course change the Accounting Color Codes to be different colors and as well as how late or early each color signifies.
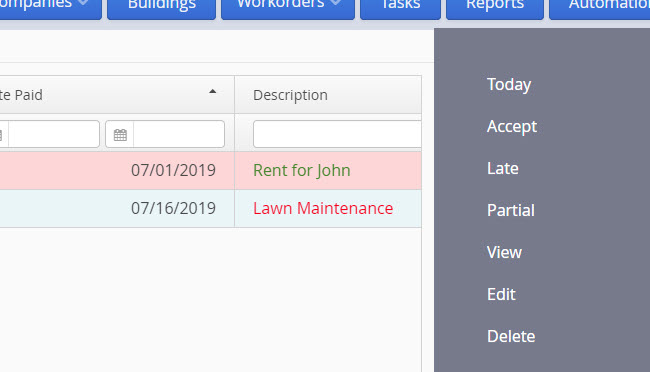
You have several options on how to approve and process the entry using the different menu items as well as edit the Suggested Accounting Entry directly in the table. Each option is covered in its own Section below with the manual option covered first followed by the other options as they appear in the right side menu.
Edit and then Accept the Suggested Accounting Entry
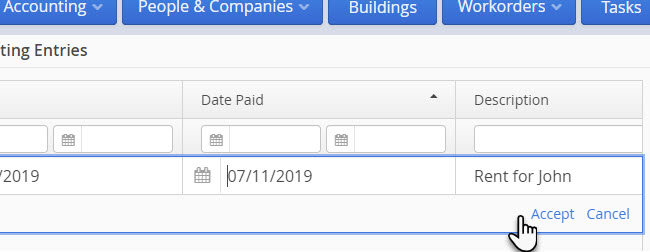
The first option is to edit the Suggested Accounting Entry and then approve it. This can be done in one of two ways.
If you have minor or quick edits then the best and easiest option is to just double click on the Suggested Accounting Entry and edit the value directly in the table. The most common example is where you just want to edit the Date Paid to whenever the payment was actually made/received. In this case it's much quicker to just double click on the Suggested Accounting Entry, edit the Date Paid, and then click on the Accept button for the edited row.
If you have a lot of edits to make, or more involved edits, then it may be better to select the Suggested Accounting Entry from the table and click on the Edit option on the right side so that you can see the full form and make all the edits you want to do.
Please note that some fields are NOT editable from the table directly such as the Notes field (in the case of the Notes field it is because it can span over many lines and as such it's not really feasible to edit paragraphs of text directly in a row in a table.
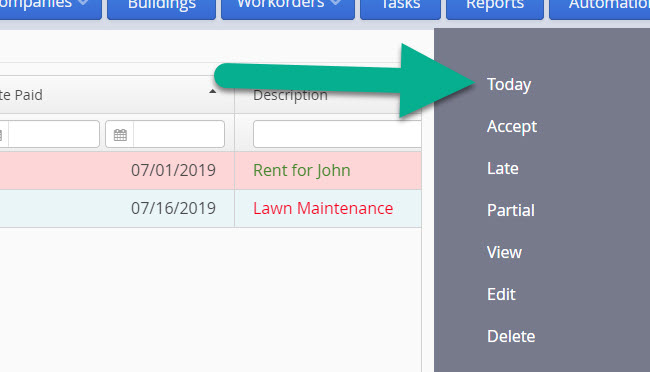
Today
The first option is to click on the Today action which will modify the Date Paid to today's date. We generally recommend processing your transactions as they are paid so that you can click on the Today action that day and have the software automatically edit the Date Paid value to today's date for you, saving you the additional step of editing the Date Paid field. It's the quickest and easiest way to process Suggested Accounting Entries.
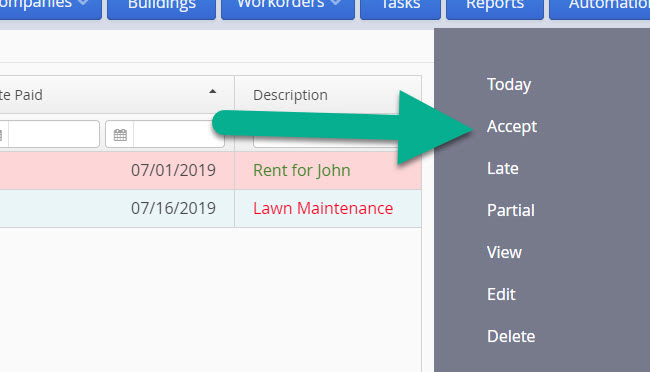
Accept
The Accept action will simply approve and accept the Suggested Accounting Entry without any modifications. This is generally used when the transaction is paid or received in full on the date that it was due.
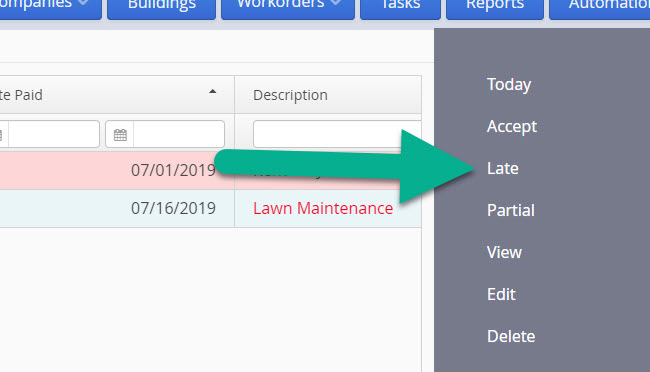
Late
The Late action is used to processed Suggested Accounting Entries that are outstanding and still due. The action removes the Date Paid and Amount Paid from the selected Suggested Accounting Entries. In other words it processes and approves them but first marks them as unpaid.
** TIP:We generally recommend processing the Suggested Accounting Entries as the payments are received/paid, and then once your grace period is over to select all the remaining Suggested Accounting Entries and process mark them all as Late in one step. The main benefit of doing it this way is that you can clean up all your remamining and outstanding Suggested Accounting Entries in one step. As well once they are marked as Late they will then appear in the Late payment reports as well as the Tenant Statement reports as oustanding balances owed, as well as any other accounting reports you may have.
** TIP:Suggested Accounting Entries are NOT included in any of the Accounting reports as they have not yet been approved. It's only when they are promoted to the main Accounting Entries table that they will be included in the accounting reports.
Assuming you are using the default sorting order for the Accounting Entries in the main Accounting Entries table you will see all the outstanding and unpaid Accounting Entries at the top of the Accounting Entries table.
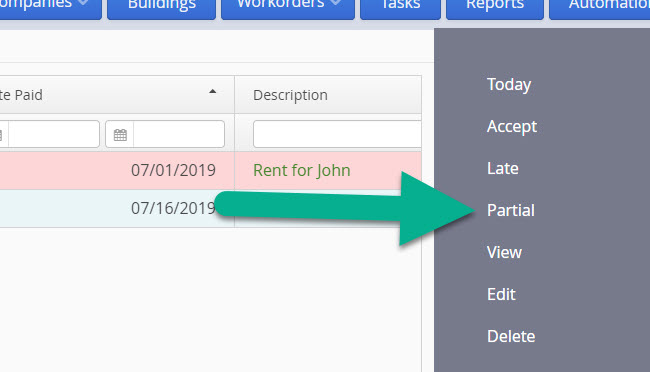
Partial
The Partial action allows you to apply a partial payment to the Suggested Accounting Entry. The partial amount paid, the date it was paid, and so on is entered in a popup window which appears after you click on the Partial action. In essence the software breaks up the existing Suggested Accounting Entry into a new Accounting Entry for the portion that was paid and edits the existing Suggested Accounting Entry to reflect the amount remaining.
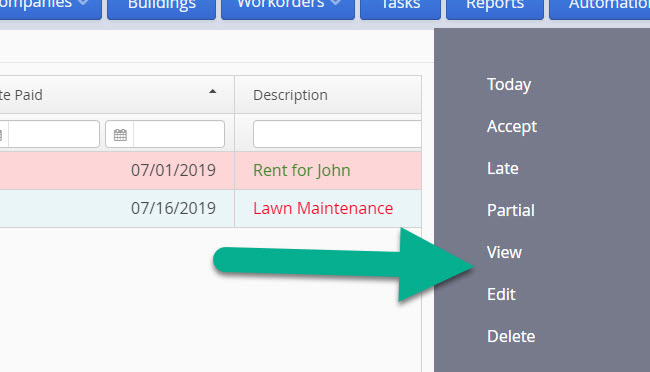
View and Edit
The View and Edit actions are as described. The View action lets you view the Suggested Accounting Entry whereas the Edit action allows you to edit the entry directly before accepting/approving it. Normally the Edit action is used if you want to make more involved edits then what is easily done by doubleclicking on the table and editing it directly in the table.
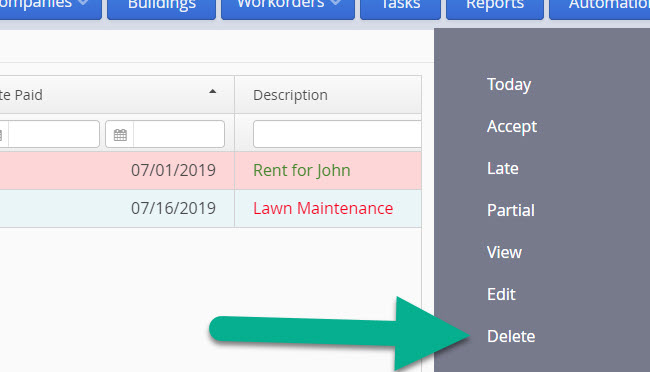
Delete
The Delete action is used to delete the selected Suggested Accounting Entries.
** TIP:If a Suggested Accounting Entry keeps appearing even after you delete it then this means you still have the associated Scheduled Accounting Entry to delete. In other words Suggested Accounting Entries are generated from the Scheduled Accounting Entries so if you are still seeing the same Suggested Accounting Entries being created then this means you have not yet deleted the associated Scheduled Accounting Entry that is responsible for creating the Suggested Accounting Entry.
2.5. Partial Payments
Partial Payments are for when you want to apply a partial payment to a transaction. A classic example of a Partial Payment is when a Tenant only pays a portion of their rent, say $200 of a $1000 rent. In this case the $200 is considered a Partial Payment. You can apply as many Partial Payments to a transaction as you want.
Partial Payments can be applied in both the main Accounting Entries and Suggested Accounting Entries sections of the software.
In the main Accounting Entries section of the software the menu can be found on both the Accounting Entries table as well as the individual Accounting Entries views. The same is true for the Suggested Accounting Entries section of the software. The screenshot above shows the Partial Payment menu option for the main Accounting Entries table view.
To apply a Partial Payment in the main Accounting Entries table you first need to select the Accounting Entry. Once selected you then click on the Partial Payment menu option to apply the Partial Payment.
** NOTE:Please note that the software can only apply a Partial Payment to an Accounting Entry that is not yet paid. That is to say an Accounting Entry where the Date Paid and Amount Paid are empty.
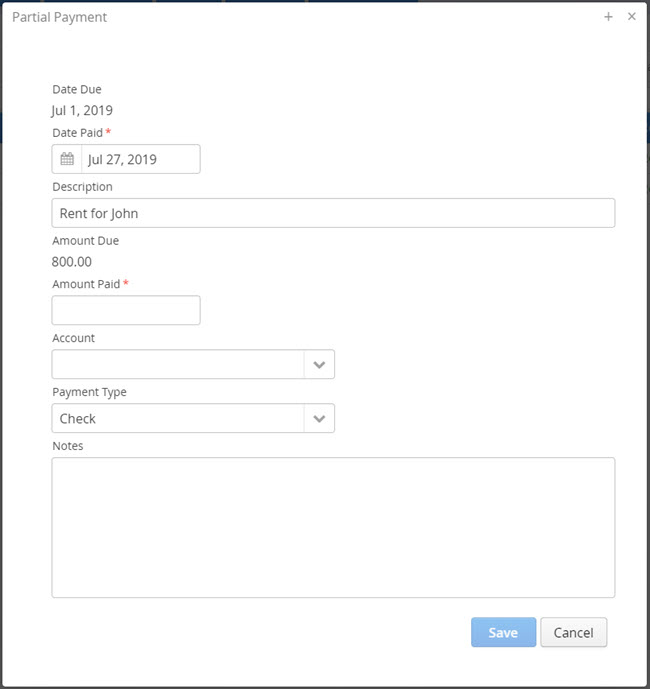
Since this is a Partial Payment the software only shows you the fields that should be applicable to the Partial Payment. So for example the Tenant field is now displayed because it should be the same for the Partial Payment. If you need to edit the Tenant or other such fields then it's really not a Partial Payment any more and you would be better off editing the Accounting Entry, or creating a new one, rather than applying a Partial Payment.
** NOTE:You don't need to worry about editing the Amount Due as the software will automatically make all the appropriate calculations and adjust the Amount Due value when you click on the Save button. It's more to let you know what the total amount due is.
After you click on the Save button you will find that the Accounting Entry has been split into two Accounting Entries. The existing entry is edited to show the new outstanding balance (Amount Due) and a new one is created for the Partial Payment.
So for example if we have a rental Accounting Entry of $1000 and the Tenant pays $200 then after applying the Partial Payment we'll have two Accounting Entries. One will be for the $200 payment and the other will be for the balance due of $800 as shown above.
When it comes to Suggested Accounting Entries it's a little different in that instead of two Accounting Entries the software will instead edit the existing Suggested Accounting Entry and create a new Accounting Entry. In other words if you applied the $200 payment to a Suggested Accounting Entry you would then have the same Accounting Entry for the $200 Partial Payment but the other $800 outstanding portion would be adjusted in the existing Suggested Accounting Entry.
** TIP:You can apply as many Partial Payments as you like, there are no limits. Therefore if a Tenant pays that $1000 rent payment in $100 installments you can do that by just clicking on the Partial Payment option each time they give you a $100 payment.
3. Data management
3.1. Searching / Filtering
All tables can be searched/filtered so that you can limit the number of entries in your view list to only those that you're interested in. You can find searches/filters in the Accounting, Workorders, Buildings, Units, Contacts, Receipts, and Invoices sections of the software.
** Please note that searches are reset on page load because it is very easy to forget that you have set the search in a specific way so if you're looking for a specific item such as an Accounting Entry and it seems to have disappeared, check your search fields before you panic. And of course you can always reload the page to clear the searches.
The video below covers both how to completely customize the tables in addition to how to search on any column. As in it shows you how select which columns appear in the tables, in what order they appear, how to sort the columns, and of course how to search for data within the tables.
SECTION 1: Date Searches
Date searches can be used to search for a range of dates, with the most common search being showing all the entries for a specific month. As a result they have two fields, the first being the Start Date and the other being the End Date.
If you want to search for all entries due in May 2021 then you would enter in May 1, 2021 in the first field and May 31, 2021 in the second field as shownn in the screenshot above.
If you want to search for all entries after today then you would simply just enter in today's date in the Start Date field (the first field) and it would show all entries for today and later (as there is no End Date). Similarly if you want to search for all entries before today you would enter in today's date in the End Date search field.
SECTION 2: Text Searches
Text searches will match any part of the text in the search field. Meaning for example if you search for "Bob" will list all entries that have "Bob" anywhere in the column. This means that "Bob Smith" would match but so too would "Apple Bob", "John Bobbit" as they both contains "Bob". The search is also case insensitive meaning that if you were ever to make a typo and enter in "bob" it will also find "Bob".
SECTION 3: Number Searches
Number searches will match any part of the number in the search field. Meaning for example if you search for "234" will list all entries that have "234" anywhere in the column. This means that "234" would match but so too would "234.00", "1234.00", and "234.65" as they all contains "234".
SECTION 3: Special Searches
Some columns have what are called special/select searches where you are presented a combobox rather than a field to type in such as the Category Type in the Accounting Entries tables. These are generally only presented when the list of available options is limited to a few values and it's more convenience to just quickly select from a list.
3.2. Buildings
One of the first thing you have to do when you enter our program is to fill up the basic information about each property.
STEP 1: Define the type of property
The software can support mixed-use properties that include both single residence homes as well as multi-unit properties.
When you create a building you have to define the type of property as either a Single Residence Home or a Multi-unit Building. Multi-unit Building can be of any size - duplex, triplex, 100-unit apartment, etc. There are no limits to the number of units per building.
Please note that multi-unit buildings are not limited to just structures with multiple units such as mutiplexes and apartment complexes, they can include mobile parks, shopping centers, student housing, etc. In these cases the property can be viewed as a Multi-unit Building.
To create a new building, go to the Building menu and then click NewNew on the right menu.
In the pop-up window, select the type of building as Single Residence Home or Multi-units Building.
STEP 2: Fill the info about the property
Enter the address information for the property in the data entry screen and click on the Save button on the bottom of the screen.
On the bottom portion of the view screen (versus the edit screen), there are multiple SubPanels in which information concerning the property can be recorded. Data in the Accounting SubPanel, along with information such as Insurances, Landlords, Documents, and so on.
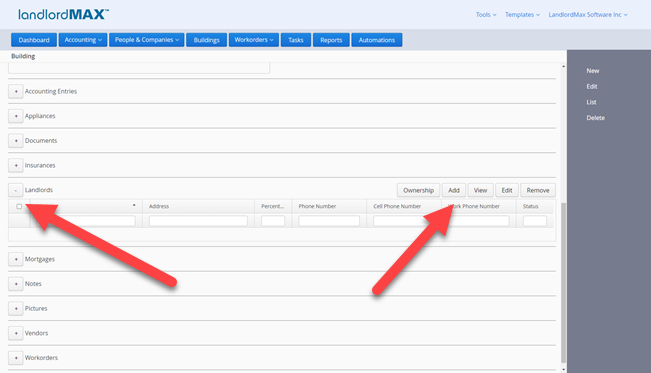
Note that you can associate a landlord to a building if the landord has been previously created in the Landlords section of the software. Click on the tab Landlords and then click Add in the right side menu. Select the Landlord from the list in the pop-up window. You can enter many landlords if the property is shared or co-owned. The ownership data is completely cross-referenced with the Landlords data entry screen.
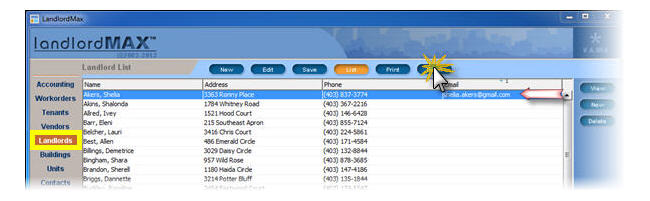
After the information is filled, click List in the right side menu to go back to the Building list view.
In the main screen, a list of all the current buildings ordered by name will be presented assuming you haven't limited the list by setting the filters.
3.3. Units
A unit can represent more than just a standard unit in a building in a multiplex or apartment complex. It can also represent a mobile house in a mobile park, a commercial unit in a shopping center, a bedroom a shared residence or boarding house, and so on.
STEP 1: Create a unit
You can only create units for your buildings in theUnits menu. Once you've created the Unit(s), the software will automatically calculate the unit count for you under the Building. As well, the list of available Units for the selected Building is automatically adjusted for you in the drop down menus when the Building is selected.
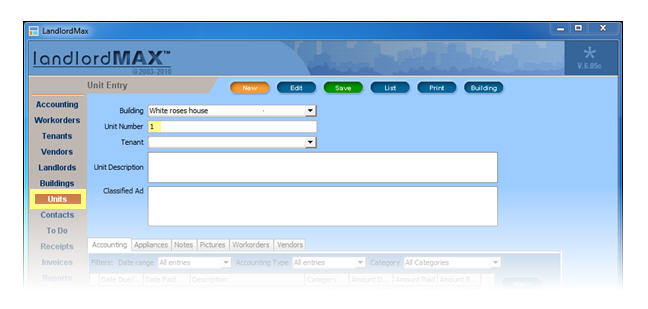
To create a new unit, go in the Units menu and click New. In the upper section, select the building and identify the unit number.
It is normal at this point, if you followed our suggested order to fill in information (see quickstart), that you cannot see any tenant name in the dropped down list for the tenant field. Tenants will be created later and their unit will be associated in the Tenant menu. As all data is cross-referenced with the other sections, the tenant's name will then appear in the Unit's information when selected through the Tenant data entry screen. If for some reason you have already created tenants, you can simply select the one associate to the unit now.
Note that you can also enter a unit description, the classified ad you used to advertise the unit, and so on.
STEP 2: Fill the info about the unit
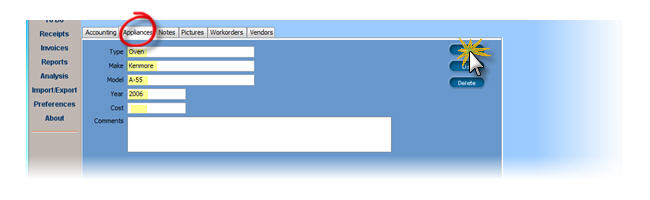
The Unit allows you to store a lot of additional information for each unit. For example, you can store Appliances, images of the unit, and so on. You can find this information on the bottom portion of the screen in the tabbed panels. Data in the tab Accounting, Vendors and Workorders will appeared automatically from entries filled in the appropriate sections of the software (for example Accounting from the Accounting Entries in the Accounting section of the software). All information is optional.
To enter your data click on the appropriate tab and then click New or Add in the right side menu.
When you have entered all the information you wish, click Save on the top menu (the button is green when you need to save and returns blue when done) and then List to return to the main screen.
In the main screen, a list of all the current units ordered by number will be presented.
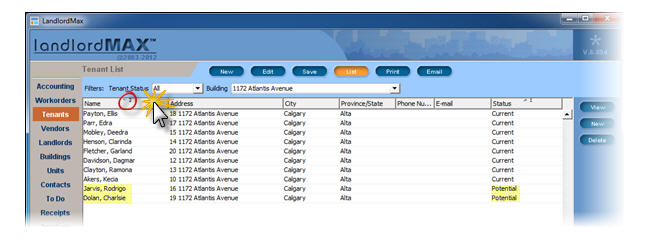
3.4. Tenants
Now that you have defined your properties you need to identify who will live in them.
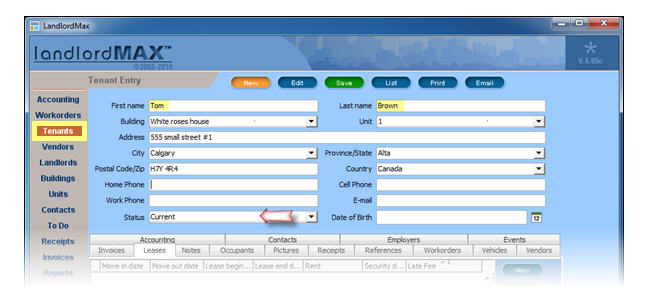
STEP 1: Create a new tenant
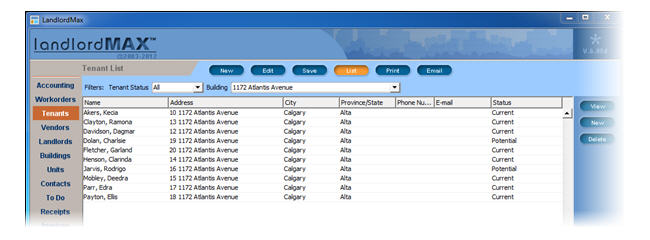
To create a new tenant, go in the Tenants menu and click New. In the upper section, enter the name of the tenant, associate a building and a unit and select the Status to "Current". Setting the Status to Current tells the software that the tenant is the currently residing tenant in that Building and/or Unit.
When the Building is selected, the address information for the Tenant will be automatically filled according to the Building information previously entered. This data can be overwritten by simply typing in the values in the appropriate fields.
STEP 2: Fill the info about the tenant
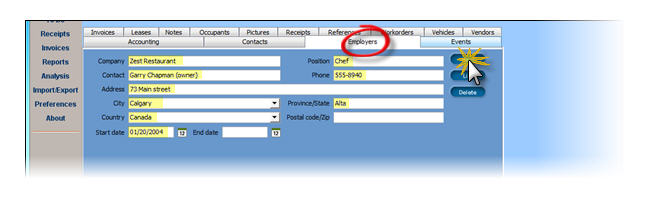
In the bottom portion of the screen, there are many tabs in which information concerning the tenant can be recorded. Data in the tab Accounting, Vendors, Workorders, Invoices and Receipts will appeared automatically from entries filled in the appropriate sections of the software (for example Accounting from the Accounting Entries in the Accounting section of the software)
To enter any other information, click on a tab and then click New or Add in the right side menu.
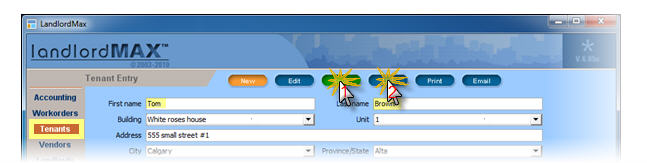
When you are happy with all the information you have entered, click Save on the top menu (the button is green when you need to save and returns blue when done) and then List to return to the main screen. In the main screen, a list of all tenants will be presented.
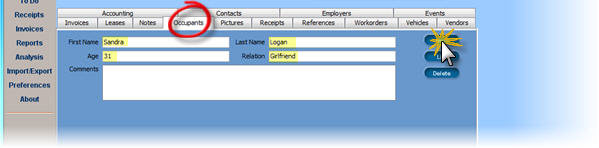
STEP 3 (Optional): Fill the info about the occupants
The software allows only one tenant per unit. For scenarios where you have multiple people living in the same unit, we generally suggest you create one principal tenant and define the remaining people as occupants in the tab Occupants.
If however you need the tenants to be completely separated such as a boarding house or where the rooms are individually rented out, then as an alternative we suggest you create additional units for the property, one for each "bedroom" or real unit rented. In other words, Unit 101 that has 4 rooms would actually be unit 101-a, 101-b, 101-c, and 101-d because in effect each bedroom is really its own unit with its own Tenant, its own Leases, and its own Accounting (rents paid, etc.)
STEP 4: Moving out a tenant
First change the Status field (shown above) from "Current" to something more appropriate such as "Past", "Evicted", etc. to correctly represent the Tenant's Status.
Next verify that no Lease is currently active for the Tenant, and if so make the appropriate adjustments. That is possible edit the Lease End Date and/or Move Out Date to correctly reflect when the Tenant actually left. Leases are discussed in further details in the Lease chapter.
Please note that it's possible to have a Lease for a Tenant that is not currently living in the Building and/or Unit, such as leases for parking spaces, college students not living on the property during summer holidays, storage units, and so on.
3.5. Leases
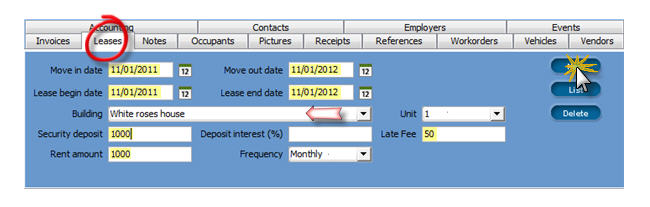
Leases can be found in the Tenant section of the software, under the tabbed panel "Leases". They are used to help you manage your rentals, especially in regards to your Rent Roll and so on.
STEP 1: Creating a lease
To fill in information for the Lease for the Tenant, go in the Tenants menu, click the tab Leases, then click New in the right side menu and enter the appropriate information.
STEP 2: Enter recurrent rent payment
Each time you create a lease, an Scheduled Accounting Entry, as well as a Scheduled Invoice and Receipt by default are automatically created and are recurring at the Frequency you specified in the lease (monthly for monthly rents, and so on).
In turn, the Scheduled Entries will create Suggested Entries at the appropriate times with pre-defined Advance Notice for you to Accept, Edit, or Deny in your Accounting board (see creating a scheduled entry in accounting for more details).
Although creating a Lease automatically creates Scheduled Entries for you they are not linked because of several reasons. For example the rent can be paid late, rents can be paid after a lease is completed, etc. As well some Tenants will transition to a month to month rent without a Lease, and therefore some people prefer to just keep the Scheduled Entries around rather than having to re-enter a new one manually. Therefore, when a Tenant moves out, you will also have to delete the Scheduled Entries.
As well, for the same reasons, editing a lease does not adjust the Scheduled Entries, or any other related entries for safety reasons. For example, if it did, editing a lease would then cause your previous Accounting Entries to also be edited, which is very likely wrong and could result in a lot of issues. Therefore as stated before, although Leases do create Scheduled Entries, they are not linked to the Scheduled Entries they have created.
This is also true if you change the Tenant's Status to Past because it's very much possible to have a past tenant still owe you monthly rents from an existing lease (for example a tenant that is no longer living there but still has some time left on the lease, or a parent leasing a unit for their college kid during the summer).
STEP 3: Renewing a lease
There are two steps to renewing a lease:
First you need to close the existing lease (Lease End Date). It is NOT advised that you edit an existing lease rather than close the current one and create a new one in the unfortunate case that you have to go to court and need your tenant's past lease history. Therefore it's important to keep the information from the previous lease and create a new lease as they renew their leases.
Secondly, because the Lease isn't connected to the Scheduled Entries, you will most likely want to delete the Scheduled Entry created from the previous lease. And as you're creating a new lease, new Scheduled Entries will be automatically generated for you for the new Lease.
If the Tenant is transitioning to a month to month Lease, then the most common method to record this is to create a new Lease with a Start Date but no End Date. This means the lease is ongoing, or month to month.
STEP 4: Increasing the rent
There are several ways to increase a rent in the lease, of which a couple are illustrated below.
In most cases, rental increases occur when leases are renewed, which means you can just create a new Lease. If this is not the case and the rent is increase midway through a lease, then the recommend solution is to break the Lease up into two separate Leases, one for each part of the rental amount.
If the tenant is renting on a month to month basis, it is likewise recommended that you end the previous month to month Lease and create a new Lease with the new rental amount. The biggest advantage of doing this is that you retain an accurate record of exactly what rental amount was paid when, should you ever need this information.
STEP 5: Pro-rated rent
The software tries to automate as best as it can the creation of the Scheduled Entries for you (Scheduled Accounting Entries, Invoices, and Receipts) based on the Lease information. However in some cases this automation will not work, such as when you pro-rate rents. In these cases you will have to delete the Scheduled Entries the software tried to create for you and manually create them yourself. As well, you'll need to manually create the first, and probably last, Accounting Entries, Invoices, and Receipts manually as they don't lend themselves to the Scheduled process very easily.
Therefore if you created a monthly Lease starting on the 11th, then all rents will be generated for the 11th because, and although this may not have been your intention, this is exactly what you've told the software to do. As such, the Scheduled entry will have been incorrectly generated and you will therefore have to delete it and create your own Scheduled Entry manually.
STEP 6: Late fees
The software offers the ability to set a fixed Late Fee for automatic late fee calculations in the Accounting system (see Creating a Scheduled Entry in the Accounting chapter for more details).
3.6. Landlords
LandlordMax can support multiple property owners in its database. In the software they are called "Landlords".
A property owner (landlord) can own multiple buildings, as well multiple people can own a single building. For reporting functionality, it is also possible to assign the percentage of ownership to the individual landlords for each property.
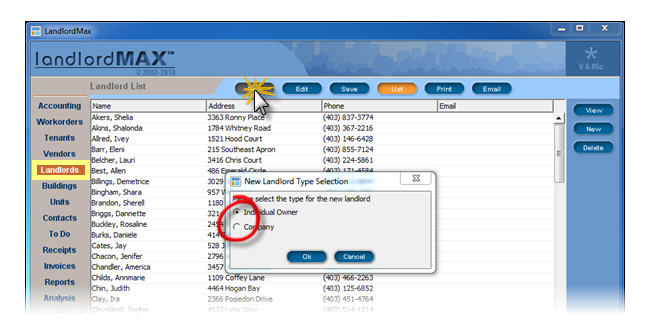
STEP 1: Create a landlord (property owner)
Landlords can be created at any time, the software doesn't force you to enter in one set of data before the other. Therefore you can create the Buildings or Landlords in either order, you just can't assign one to the other until they are both created.
To create a new Landlord, go the Landlords menu and click New. In the pop-up window select the type of Landlord as Individual Owner or Company.
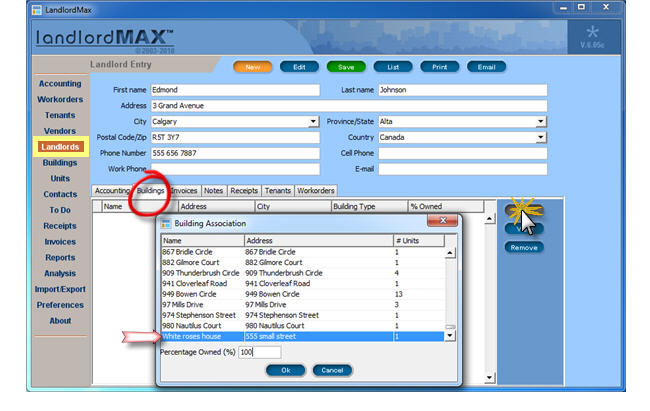
STEP 2: Fill the information about the landlord
In the upper section of the screen, enter the landlord's contact and other information.
Next you can associate a building to the landlord. In the bottom section of the screen, click on the tab Buildingsand then click Add in the right side menu. Select the Building from the list in the pop-up window. You can enter as many properties as the landlord (or property owner) owns, including the percentage for each property. The data is completely cross-referenced with the Buildings data entry screen.
Please note that you can also go to the tab Notes to enter in any additional information you wish about the Landlord, including ownership structure, any types of names, identification numbers, etc. above the normal day to day notes you need to record.
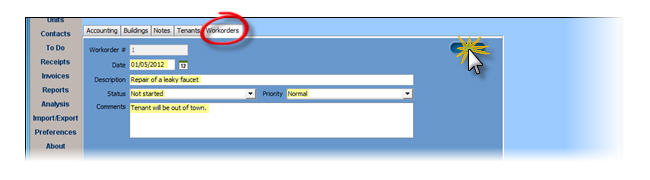
Data in the tab Accounting, Invoices, Receipt, Tenants and Workorders will appeared automatically from entries filled in the relevant sections of the software (Accounting from the Accounting Entries, and so on).
3.7. Vendors
The Vendor section of the software is used to store information about both the vendors you used to manage and service your properties as well as the stores, companies, etc. you made purchases from. These can include contractors, suppliers, service providers, utilities, stores, etc.
They are used so that not only can you keep a list of your vendors and tradespeople nearby (including their contact information), but also so that you can generate reports based on vendors (for example you can run a report to see how much you paid Andrew your plumber over the last year, last month, how much you spent at Home Depot, etc.).
STEP 1: Create a new vendor
To create a new Vendor, go to the Vendors menu and click New. Enter the address of the vendor in the upper section of the screen.
STEP 2: Fill the info about the vendor
In the bottom portion of the screen, there are several tabs in which information concerning the Vendor can be recorded.
In the tab Accounting, the information are from entries filled in the Accounting system. The lists found in the tabs Buildings, Tenants and Workorders are also automatically generated for you based on the Workorders. Workorders are the only way to associate a Vendor to a Building, Unit, and/or Tenant. What this means is that if you have a Workorder which is linked to your Vendor, the associated, Building, Unit, Tenant, from that Workorder will also be listed under the Buildings and Tenants tabs.
To edit information, click on the tab of your interest select an itemand then click View in the right side menu. After the information is edited, click List in the right side menu. When you are happy with all the information you have filled, click Save on the top menu (the button is green when you need to save and returns blue when done). Please note that because the data is cross-referenced, if you edit an Accounting Entry, it will also make the same edit in the Accounting system for that Accounting Entry, and so on.
3.8. Contacts
The Vendor section of the software is used to store information about both the vendors you used to manage and service your properties as well as the stores, companies, etc. you made purchases from. These can include contractors, suppliers, service providers, utilities, stores, etc.
The Contacts section is used to store information about the people, companies, etc. that don't really provide a service for you but whose contact information are nevertheless important for you to keep. These could for example be government employee contacts, bank representatives, board of trustee members, and so on.
STEP 1: Create a new Contact
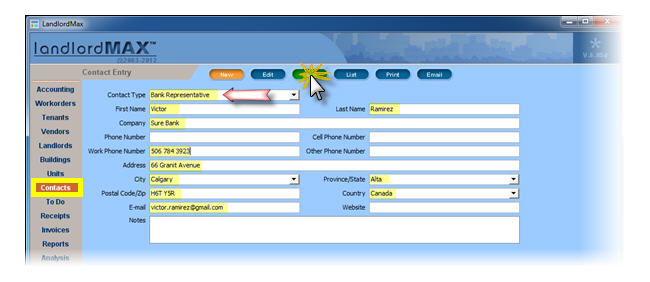
To create a new contact, go to the Contacts menu and click New.
STEP 2: Assign a Contact Type and enter information
In the first field called Contact Type, enter a word that describes the contact such as Government employee or Bank representatives. Fill up the rest of the information. If you've already entered the Contact Type before, the software will autofill/select the value for you. Additionally you can select it from the drop menu.
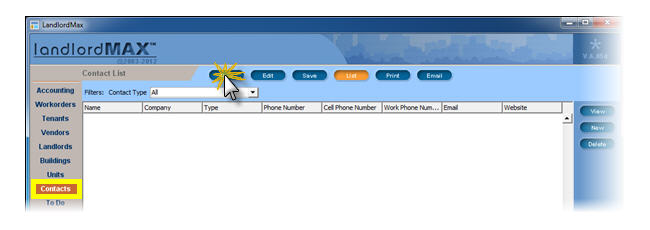
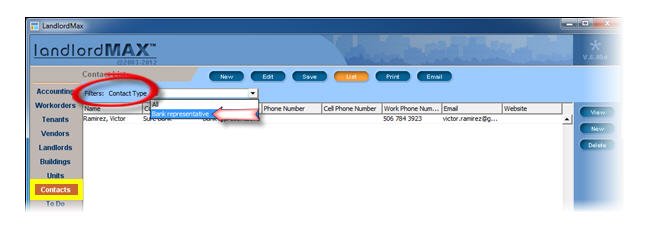
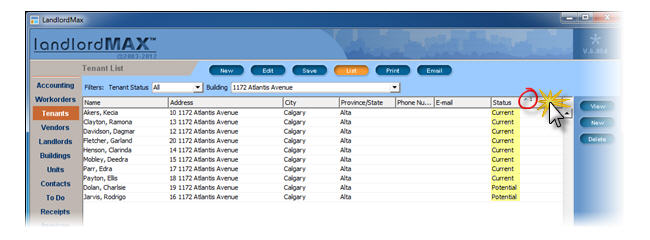
STEP 3: Filter the Contact List
The Contact Type can then be used to filter the Contact list in the main table. Click on the drop down filter at the top of the screen and select the Contact Type you wish to use for filtering. So for example if you only wish to see Government Employee contacts, you could select "Government Employee" as the Contact Type filter.
3.9. Tasks list
As part of managing your properties you will generally need to manage a Tasks list of all the tasks you need to complete. This list can include for example, your appointment to the bank, to write an ad for the apartment for rent, go shop a new sofa for the lobby, find a new gardener, call your lawyer for the eviction of a tenant, etc...
** Important Tip: For the networked system, tasks are specific to a user, they are not shared across all users. Therefore this means that each user has their own list of tasks and can manage them individually.
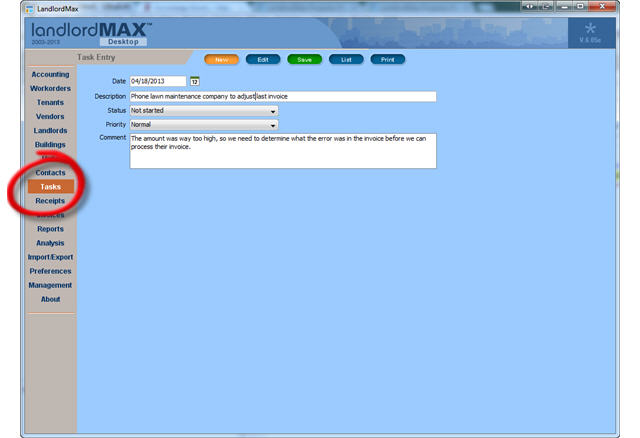
Step 1: Create a Task task
To create a new task, go to the Task menu and click New. Fill the information about it and click Save at the top of the screen when done. Click List to return to the list of all the tasks you have to do.
3.10. Workorders
Workorders are provided to assist you in managing your maintenance staff by keeping track of their work. Basically Workorders are a way to setup tasks, manage them, and keep everything organized for your employees and trades people. This allows you to create work that have dates, statuses, priorities, price and so on.
You can then generate a number reports on this information to give to your superintendent to work and coordinate from, to your employees, and so on. Reports can be generated based on a number of criteria (example: List all workorders for a specific building grouped by building unit and so on).
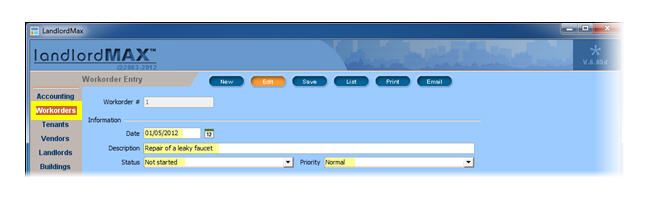
STEP 1: Enter general info
To create a Workorder, go in the Workorders menu and click New.
In the upper part of the screen, fill the information about the work to be done. Note that there are many Statuses to choose from in the dropped down menu so you can keep the specific history and state of where of the work. Once back in the main screen of the Workorder menu, you can filter the list of workorders according to their Statuses, etc.
STEP 2: Enter accounting info
In the Accounting section of the Workorder, enter the cost of the effort, choose a Category from the drop-down list that best describes the type of work (or create a new custom one) and enter the Payment Due Date.
This is done because when you create a Workorder, the software will by default (you can turn this off in the Preferences menu) use this information to automatically create a Suggested Accounting Entry for you so that you don't have to re-enter it in a second time in the Accounting section. Although the Workorder creates a Suggested Entry for you they are not linked for safety reasons just like the Lease and Scheduled Entries aren't linked. Therefore if you make a change in one, it will not affect the other. For example, it's possible that a workorder is only partial paid, paid late, reimbursed, never paid, adjusted, never completed, and so on. Hence, we strongly suggest you rely on the Accounting system for the correct accounting totals and not the workorders.
STEP 3: Enter association info
From the dropped down list, choose the Vendor who is the one that will be responsible for the work, as well as the Tenant and Building and/or Unit they will be dealing with.
Once saved, the workorders will also appear in the tabs Workorders under the Vendor, Building, etc. sections of the software because the data is cross-referenced. For example, this workorder will be list for the tenant Lesy Samuel in their Workorders tab.
3.11. Invoices and Receipts
Invoices are meant to be given to your tenants before the rents are due, as a notice of payment. One of the benefits of this is that you have evidence in court that your tenants knew ahead of time when and what rents were due. Invoices are not just use for rents, you can produce an invoice to your tenant to inform them about any amount they may owe you (electricity bill, parking...).
Receipts are a record of payment which you give to your tenants after you have received the rent or other payments.
Invoices and receipts are completely optional. Many tenants don't require or really just don't care about invoices and receipts, and therefore many property managers or landlords avoid this step if there is no benefit, which is why they are completely optional.
All the steps required to deal with a receipt are the same as for an invoice, and vice versa. Therefore, we will describe only the steps related to an invoice because they are the same for receipts.
Depending if you need an invoice for a rent, a one-time payment such as a damage fee, or a recurrent payment such as an electric bill, you will choose from the steps 1A, 1B, or 1C.
STEP 1A: Create an invoice and a receipt for a rent
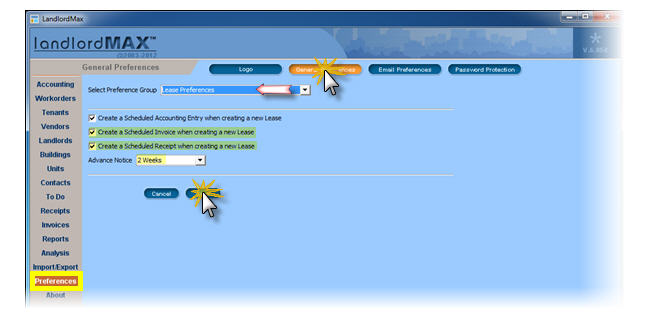
By default in the program, each time you create a new lease, a Scheduled Invoice and a Scheduled Receipt are both automatically created for you and are recurring at the frequency you specified in the lease (ex: every month).
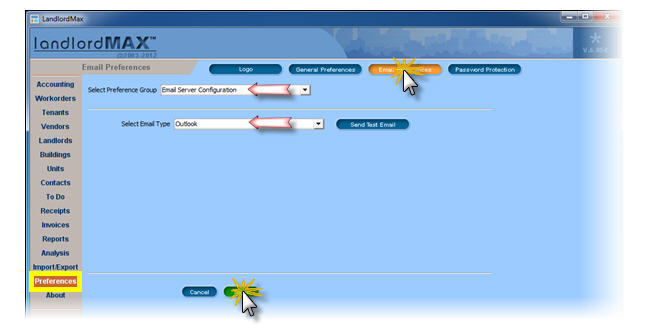
This feature can be enable or disabled in the Preferences menu, when you click General Preferences and then select the preference group to Lease Preferences.
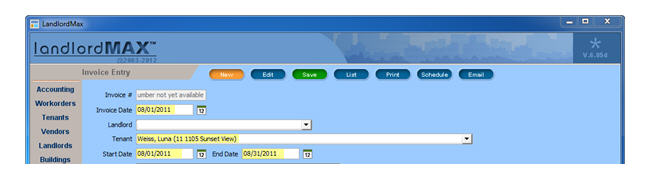
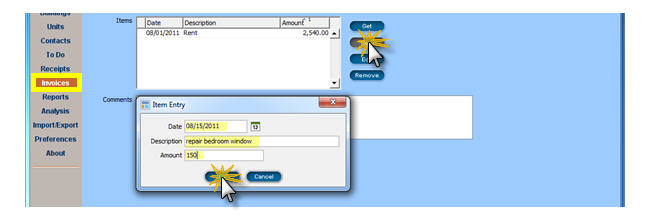
STEP 1B: Create a one-time invoice or receipt
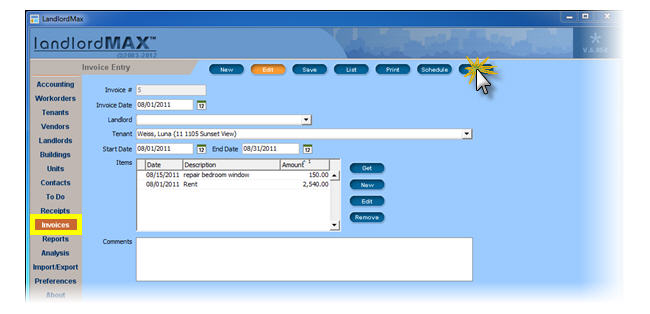
To create a new invoice, go to Invoices menu, click New at the top of the screen and fill the information related to that invoice. The Start and End Dates of the Invoice are to indicate the timeframe which the invoice is applicable. So for example a rental invoice for the month of January would be from January 1st to January 31st.
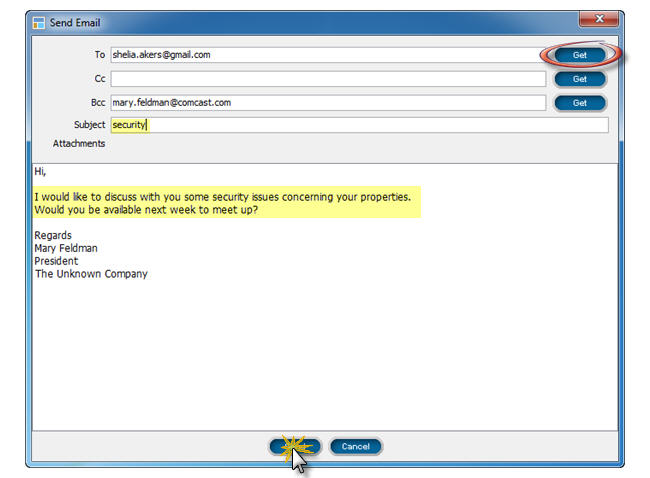
You can associate a landlord and/or a tenant to the invoice depending on which information you wish to present on the invoice.
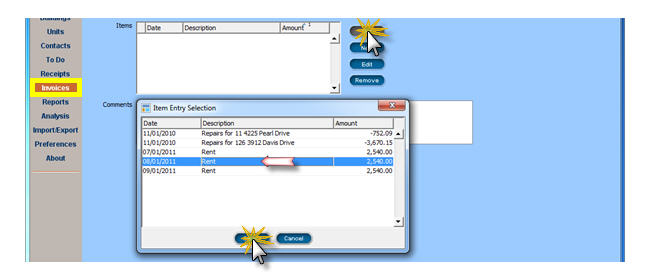
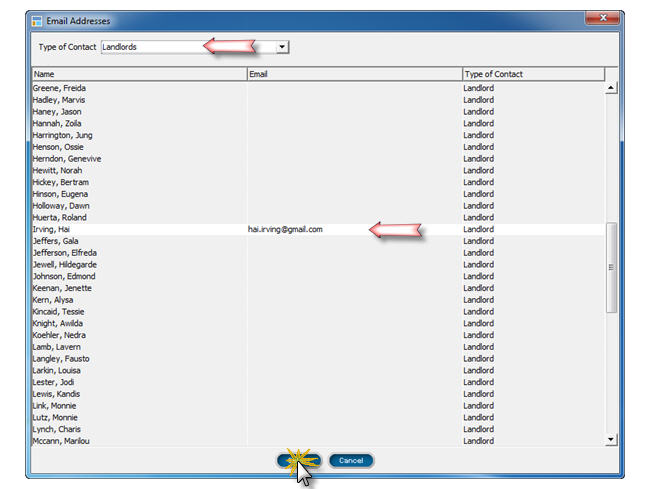
To add a payment from a pre-existing Accounting Entry Click Get on the right side of the items box. In the pop up window you will see a list of accounting entries associated to the Landlord or Tenant you chose. Select the ones you want and click Select.
To create a new Payment, click New on the right side of the items box. In the pop up window, enter in the appropriate information and click Ok.
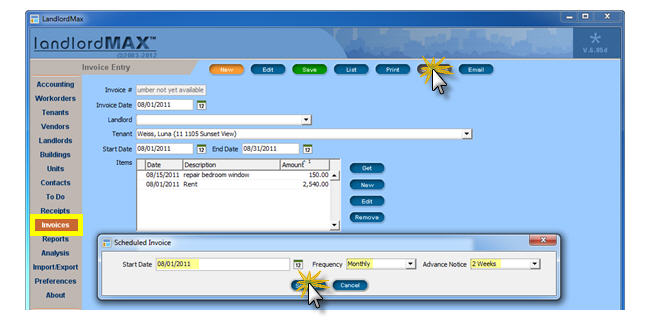
STEP 1C: Create a scheduled invoice or receipt
If the invoice you want to create is about a recurrent payment, click on Schedule at the top of the screen and fill the information in the pop-up window. You will need a Starting Date for when the invoice will start, a Frequency at which the invoice will be recurring, and an Advance Notice so you can be informed when the invoice is about to come. Alternatively you can also go to the "Scheduled Invoices" tab in the main window to create new Scheduled Invoices, as well as view, edit, and delete existing ones.
STEP 2: Edit the invoice or receipt
Each time a Scheduled Invoice or Receipt is created, a Suggested Invoice or Receipt is created as well. If your Invoices change each month, then you have to edit the entries each month to the appropriate amounts. This can include previous balances owed or the gas bill for example (assuming the tenant didn't have a previous invoice for the amount).
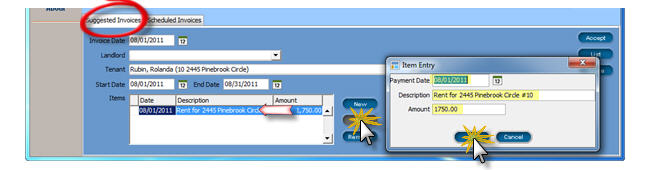
In the Invoices menu, click on the tab Suggested Invoices, select an invoice and click View on the ride side menu.
To edit a payment, select one from the list in the items box and click Edit. In the pop up window, edit the payment then click Ok.
** Note: Although you are selecting an Accounting Entry, there is no link within the software between the invoice payment and the Accounting Entry for safety reasons. For example if you edit an Accounting Entry, the software shouldn't change the Invoice because this may have already been printed and given to your tenant. Similarly, it's possible that the tenant doesn't pay, doesn't pay in full, and so on, which means that the Invoice may not match the actual Accounting Entry.Therefore, changing the selected Accounting Entries value in the accounting screen will not change the invoice payment entry, or vice versa.
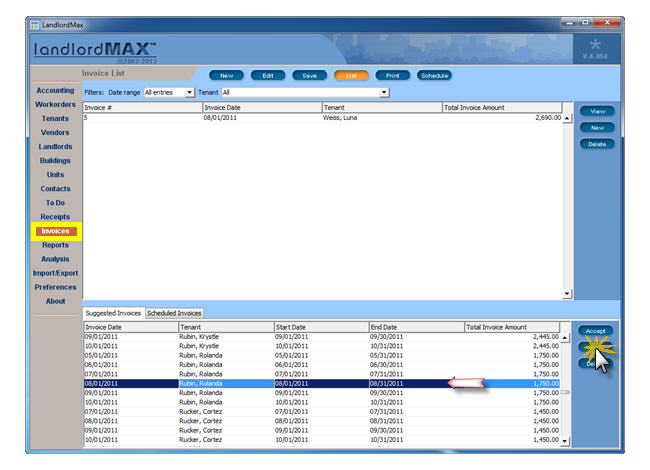
STEP 3: Accept the invoice or receipt
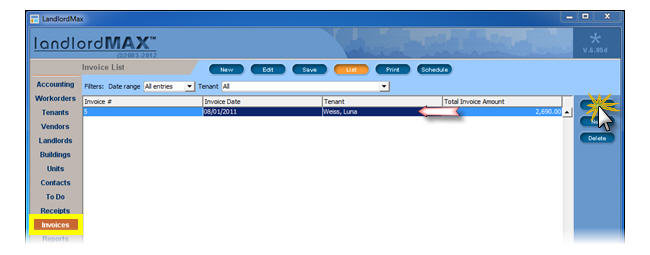
If you created a one-time invoice described, it will instantaneously be visible on the Main Board in the upper portion of the screen. However, if you created a Scheduled Invoice, it will be listed among others in the tab Suggested Invoice at the specified time. You have to either Accept, Edit and Accept, or Deny the Suggested Invoice onto the Main Board.
In the Invoices menu, click on the tab Suggested Invoices, select an invoice and click Accept on the ride side menu. Once accepted the data jump to the upper portion of the screen.
STEP 4A: Print the invoice(s) or receipt(s)
In the upper portion of the screen select the invoice of your choice and click Print in the top menu. Please note that you can select multiple invoices for them to be print at the same time.
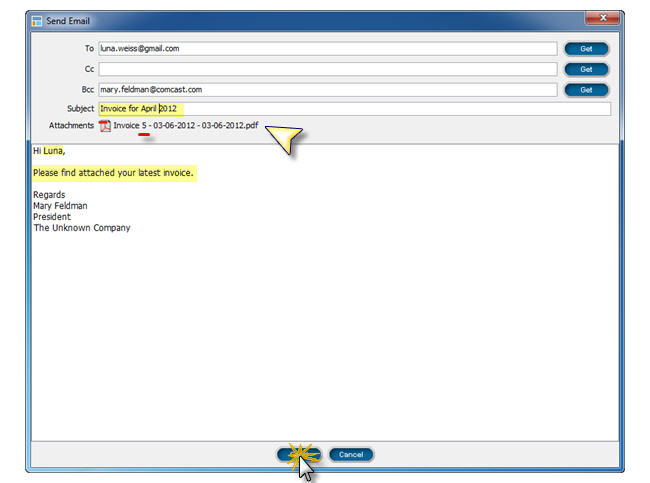
STEP 4B: Email the invoice or receipt
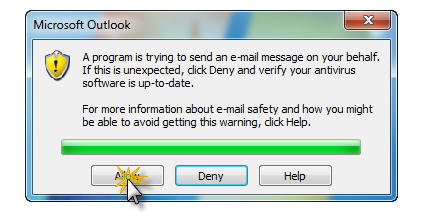
In the upper portion of the screen View the invoice of your choice and then click Email in the top menu. You can only email one Invoice at a time because each invoice requires an addressee (To) and a message. As well, sending all your invoices at the same time can result in your email address, domain, and/or server being incorrectly flagged as sending spam emails which can lead to all sorts of complications and problems.
STEP 5: Matching up invoices and receipts and accounting
Invoices and receipts are separate and independent and they may not match up to the accounting system. It's very easy for the amounts to get out of synch. For example it's possible to have an invoice for a rent that's never paid. It's also possible to have a receipt for a rent where the check bounces a week later. In this case, your invoices will not match your receipt, nor the accounting entries. Therefore because they are separate you can do whatever type of mixing and matching you need, which works to your advantage here.
As well, many tenants don't really care or want any invoices and/or receipts even if they should, so for those property managers and landlords it's possible to omit this section completely for those tenants and save them some time when processing rents.
This is also why all accounting related reports generate their data only from the accounting section and not the Invoices and Receipts.
3.12. Pictures
A picture is worth a thousand words. It can be very useful to illustrate different situations such as repairs done on a building, damages done to a unit, etc. It can also be very handy to have pictures of your tenants and occupants for record keeping purposes. With LandlordMax you can add pictures to your Buildings, Units, and Tenants.
STEP 1: Add a picture
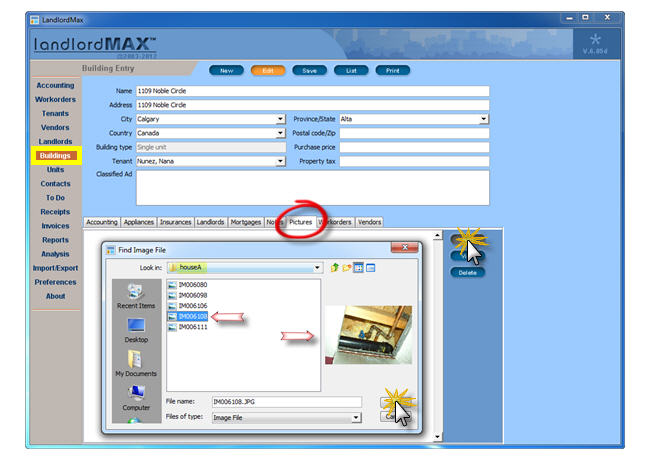
Go to the Buildings, Units, or Tenants Menu, click on the tab Pictures and then click Add on the right side menu. In the pop-up window select the image you want. To help you out, displayed on the right side of the window is a thumbnail preview of the picture you currently have selected.
You can choose to import one or multiple pictures into LandlordMax at a time. To select multiple consecutive picture files, click the first picture file, press and hold down Shift, and then click the last picture file. To select multiple nonconsecutive picture files, press and hold down Ctrl, and then click each picture file. As you import images a window will display a progress bar indicating how many pictures have already been imported and how many still remain.
STEP 2: Adjust the picture description
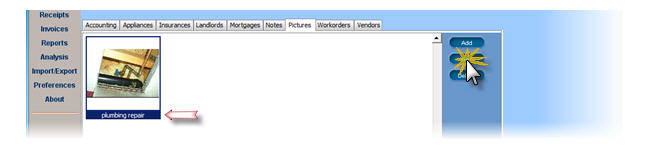
Once imported, you can change the Picture Description directly below each thumbnail. To do this, right-click on the selected thumbnail picture, select the rename option, and type in your new description. Press the Enter key to accept the editing, or the Esc key to cancel it.
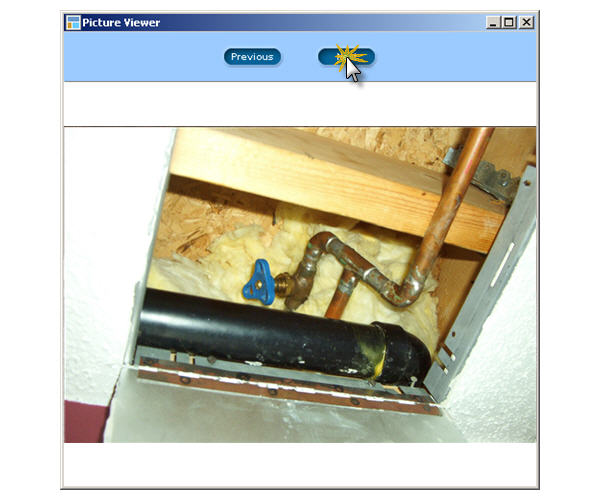
STEP 3: View a picture
You can view the image under the tab pictures in full screen mode by either double-clicking on it, or by selecting it and pressing on the View button. Above the picture, you can click Previous or Next to change the picture to the previous and next pictures in your list. Note that if you change the size of this window, the picture will be automatically re-adjusted (zoomed in or out) to use all the available space again.
4. Import / Export
4.1. Reports - Export
Once you have generated a report, you may want to open it in another program such as a spreadsheet in Microsoft Excel, a Word document, raw data as a CSV file, and so on. In order to do so, you need to export the generated reports into an appropriate file format so you can open it in the program of your choice afterwards.
STEP 1: Export the report
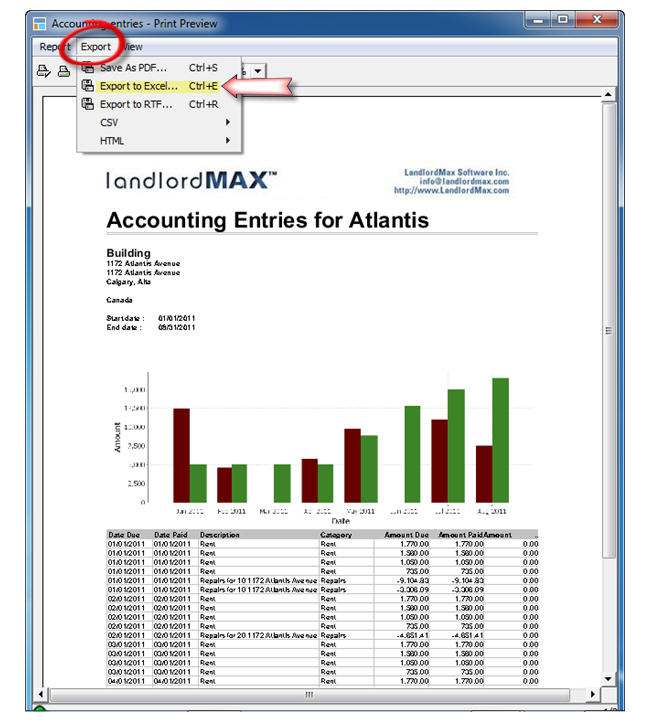
Click on Print as if you were to print the report so the preview window opens.
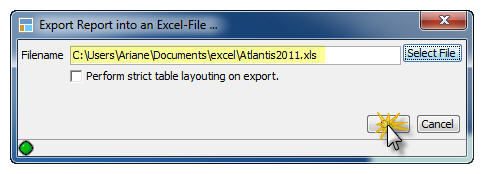
In the window, in the top menu, click Export and select in which format you want to export the report. You have the choice between PDF, Excel, RTF, CSV or HTML format.
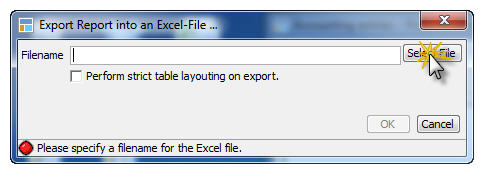
In the popup window, click Select File on the right side.
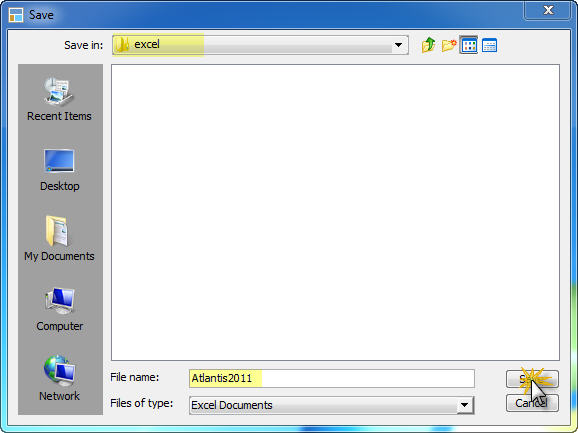
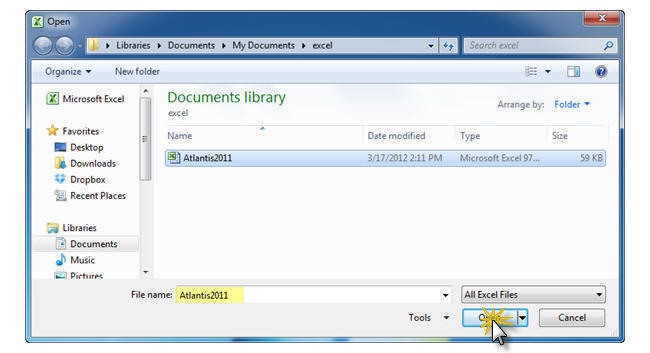
A new window will popup so you can choose where to save the new file and its name then click Save.
PDF file can be opened in Adobe Reader program, etc. CSV files are delimiter specific files, such as comma separated. The CSV file format is the best when you want to export ALL the data in RAW format so that you can import it into a number of other programs such as Excel, and so on, and customize it as you wish. The Excel format is for the Microsoft Excel spreadsheet software (please note the formatting will be exactly the same, so if any information in a column is truncated it will remain truncated because the formatting is retained - if you wish to have the raw data then you will need to export to the CSV file format which can then be imported into Excel). RTF in any word processor such as Microsoft Word.
STEP 2: Open the report in the program of your choice
Open the program of your choice (here Excel), open the new file you just created in this program and voila!
4.2. Quicken QIF file - Import/Export
LandlordMax offers the ability to import and export Accounting Entries through the QIF file format which is supported by most banks, as well as Quicken and QuickBooks (Intuit invented the file format). Please note however that this file format is quite limited in that it will NOT link any tenants, buildings, etc. to the accounting entries, this has to be done manually. This is not a limitation of LandlordMax but rather of that file format (you can find the details of what's possible by viewing the specs of the QIF file format here).
Moreover, the software will not synchronize your entries, which means it's up to you to manage which entries you wish to import and export.If you transfer the same entry twice, it will appear twice in the software.
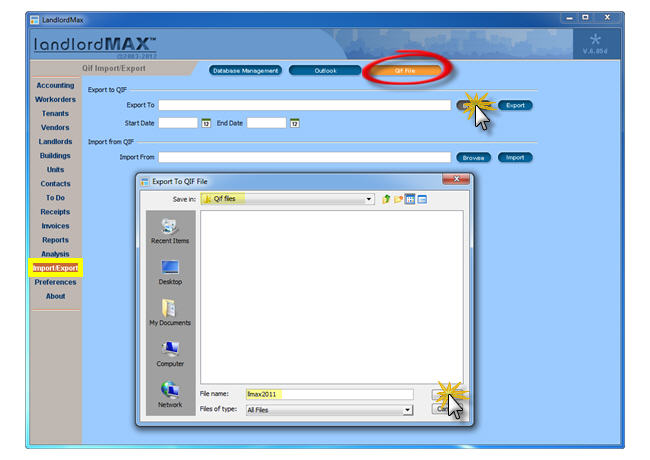
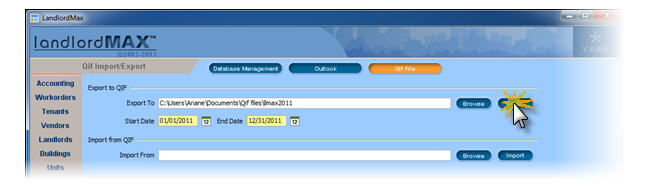
STEP 1: Export to QIF from LandlordMax
Go to Import/Export menu, click QIF File at the top of the screen. In the Export to QIF section, click Browse. In the popup window, choose where to save the exported file (the .qif file) and then chose a name for this file and click Save. Back in the main screen, choose the start and end date for the data you which to export and click Export.
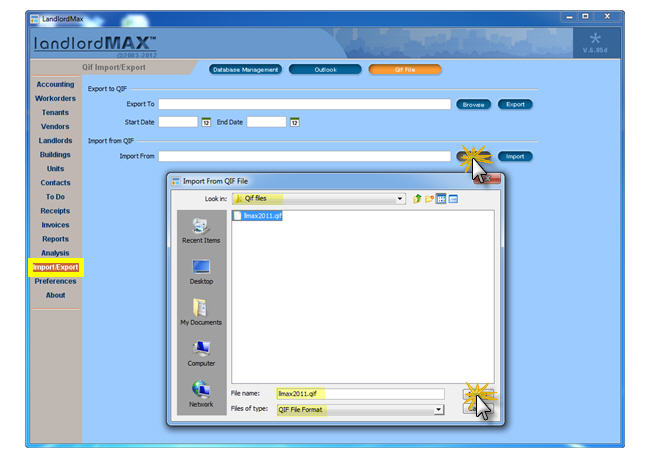
STEP 2: Import from QIF file into LandlordMax
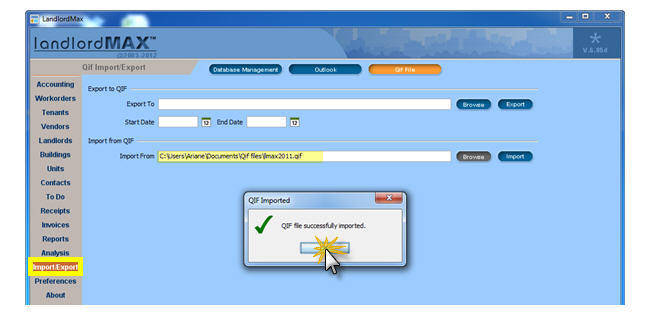
Go to Import/Export menu, click QIF File at the top of the screen. In the Import from QIF section, click Browse. In the popup window, choose where to save the imported file (the .qif file), chose a name for this file and click Save. Back in the main screen, click Import.
All the imported line items from the QIF file will be added as Suggested Accounting Entries into the Accounting section of the software. To repeat, they will not appear as accounting entries in the main list, they will only appear as Suggested Accounting Entries which then need to be approved.
5. Reports
5.1. How to Generate Reports
Once you have entered all your information, you will want to be able to see what's happening, when rents are due, which rents are late, how well your properties are doing, prepare reports for taxes, and so on. To do all this you will produce reports.
STEP 1: Select a section
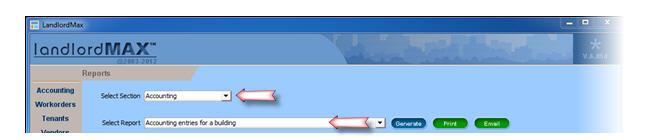
In the Reports menu, select which type of report you want to run through the dropped down list of the Select Section box. By default the software will all reports, however if you want to limit the list of available reports to the section you're interested in, you can select a "Section" such as Accounting, Workorder, Tenant, Vendor, Landlord, Building, Unit, Receipt, Invoice, Cash flow, etc. If you're unsure, you can leave it to All which will list all available reports under the Select Report box.
STEP 2: Select a report
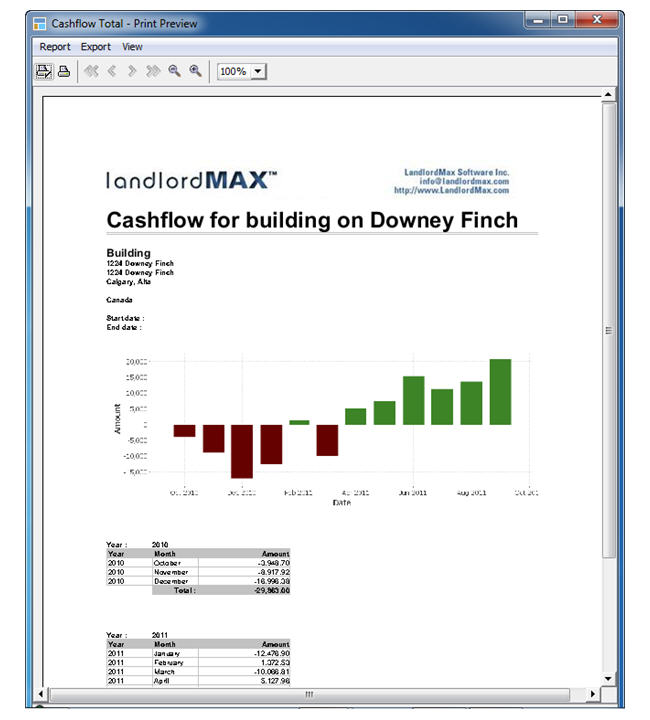
Select which report you want to run through the drop-down list of the Select Report box. You can generate different reports displaying List of items, Accounting Entries, Expenses, Revenues, Late Accounting Entries, Rent Rolls, Vacancy Reports, Late Rents, Expiring Leases, Cashflows, etc.
For example, if you're looking to see what the difference is between the income and expenses, the report "All accounting entries" in effect is giving you a profit/loss report. You can also generate cashflow reports which will give you your profitability per month without having to list all the details. As for the "late accounting entries" or "late rents" reports, these will give you an ongoing list of all your accounting entries that are still outstanding.
You will notice that many reports can also be grouped by the variable of your choice such as building, account, category, tenant, vendors, etc. so you can have a mean to subtotal and compare and evaluate which of your buildings, accounts, categories, tenants, units, etc. are more or less profitable than the others. This is also very useful for tax preparation purposes such as dealing with the 1099 statements and such.
STEP 3: Customize the report title
All report titles can be customized and personalized for printing and exporting by changing the Report Title field to what you find is most appropriate. So for example the "Accounting entries grouped by building for one landlord" report can be renamed to "Fiscal 2012 Financial Report for John Smith".
Please note that your personal letterhead/logo, which you set for the Logo Preferences, will also appear in the header of the printed or exported report.
STEP 4: Select specific constraints
You can then narrow down further the set of data for the report by specifying constraints such as which building, tenant, dates, and so on you want a report about.
Please note that if you set a Start and/or End Date for any of the accounting reports, the software will only include accounting entries that have been paid (Date Paid) between those two dates (Start and End Dates). Therefore a rent for December 1st that was paid 45 days late, in January of the following year, needs to be reported as income in the year it was collected for tax and accounting purposes, not the year it was due (doing so would be incorrect). The same is true for a corporation with a non-calendar fiscal year. If no date is specified it will include ALL entries, including those that haven't been paid (because no Date Paid range has been specified for the report).
STEP 5: Select the chart and generate the report
If appropriate and available, select the chart type through the dropped down list of the Chart Type box and click Generate on the right side menu. If you select none in the Chart Type box, you will only have a table of the data with no chart in the report.
STEP 6: Print or email the report
Once you've generated a report, you can then Print, Export, or Email the report depending on your needs. All reports can be exported to PDF, Excel, CSV, and so on. The export functionality can be found in the Print Preview Window when you clicked Print.
If at any point any field is modified after the report has been generated, the Print and Email buttons will change back to their default color of blue, meaning that the report needs to be re-generated before the print and/or Email actions can be performed.
5.2. How to Export Reports
Once you have generated a report, you may want to open it in another program such as a spreadsheet in Microsoft Excel, a Word document, raw data as a CSV file, and so on. In order to do so, you need to export the generated reports into an appropriate file format so you can open it in the program of your choice afterwards.
STEP 1: Export the report
Click on Print as if you were to print the report so the preview window opens.
In the window, in the top menu, click Export and select in which format you want to export the report. You have the choice between PDF, Excel, RTF, CSV or HTML format.
In the popup window, click Select File on the right side.
A new window will popup so you can choose where to save the new file and its name then click Save.
PDF file can be opened in Adobe Reader program, etc. CSV files are delimiter specific files, such as comma separated. The CSV file format is the best when you want to export ALL the data in RAW format so that you can import it into a number of other programs such as Excel, and so on, and customize it as you wish. The Excel format is for the Microsoft Excel spreadsheet software (please note the formatting will be exactly the same, so if any information in a column is truncated it will remain truncated because the formatting is retained - if you wish to have the raw data then you will need to export to the CSV file format which can then be imported into Excel). RTF in any word processor such as Microsoft Word.
STEP 2: Open the report in the program of your choice
Open the program of your choice (here Excel), open the new file you just created in this program and voila!
5.3. List of All Available Reports
By default the software offers almost 150 different reports however you can also create as many custom reports as you wish by going to the Report Templates section of the software and either using one of the existing reports listed below as a template or creating your own brand new report.
Please note that we also offer services to assist you with either customizing an existing report or to create your own custom report.
List of All Available Reports
Accounting Entries
Accounting Entries for a building
Accounting Entries for a category
Accounting Entries for a category for a landlord
Accounting Entries for a category for a tenant
Accounting Entries for a landlord
Accounting Entries for a payment type
Accounting Entries for a tenant
Accounting Entries for a unit
Accounting Entries for a vendor
Accounting Entries for an account
Accounting Entries grouped by account
Accounting Entries grouped by building
Accounting Entries grouped by building for a landlord
Accounting Entries grouped by category
Accounting Entries grouped by category for a building
Accounting Entries grouped by category for a landlord
Accounting Entries grouped by category for a unit
Accounting Entries grouped by category for an account
Accounting Entries grouped by payment type
Accounting Entries grouped by tenant
Accounting Entries grouped by unit for a building
Accounting Entries grouped by vendor
Accounting Entries grouped by vendor for a landlord
Checks
Checks for a landlord
Checks for a tenant
Checks for a vendor
Checks for an account
Checks for management company
Checks grouped by account
Checks grouped by landlord
Checks grouped by tenant
Checks grouped by vendor
Expenses
Expenses for a building
Expenses for a landlord
Expenses for a payment type
Expenses for a tenant
Expenses for a unit
Expenses for a vendor
Expenses for an account
Expenses grouped by account
Expenses grouped by building
Expenses grouped by building for a landlord
Expenses grouped by category
Expenses grouped by category for a building
Expenses grouped by category for a landlord
Expenses grouped by category for a unit
Expenses grouped by category for an account
Expenses grouped by payment type
Expenses grouped by tenant
Expenses grouped by unit for a building
Expenses grouped by vendor
Expenses grouped by vendor for a landlord
Expiring leases
Expiring leases for a building
Expiring leases grouped by building
Expiring leases grouped by building for a landlord
Landlords
Late payments
Late payments for a building
Late payments for a category
Late payments for a landlord
Late payments for a tenant
Late payments for an account
Late payments grouped by building
Late payments grouped by building for a landlord
Late payments grouped by category
Late payments grouped by tenant
Late payments grouped by tenant for a landlord
Late payments grouped by unit for a building
Leases
Leases for a building
Leases for a landlord
Leases for date range
Mailing labels for landlords (Avery 8160)
Mailing labels for tenants (Avery 8160)
Mailing labels for tenants for a building (Avery 8160)
Mailing labels for tenants for a landlord (Avery 8160)
Profit & Loss - monthly
Profit & Loss - yearly
Profit & Loss for a building - monthly
Profit & Loss for a building - yearly
Profit & Loss for a landlord - monthly
Profit & Loss for a landlord - yearly
Profit & Loss for a vendor - monthly
Profit & Loss for an account - monthly
Profit & Loss for an account - yearly
Rent Roll
Rent Roll for a building
Rent Roll grouped by building
Rent Roll grouped by building for a landlord
Revenues
Revenues for a building
Revenues for a landlord
Revenues for a payment type
Revenues for a tenant
Revenues for a unit
Revenues for a vendor
Revenues for an account
Revenues grouped by account
Revenues grouped by building
Revenues grouped by building for a landlord
Revenues grouped by category
Revenues grouped by category for a building
Revenues grouped by category for a landlord
Revenues grouped by category for a unit
Revenues grouped by category for an account
Revenues grouped by payment type
Revenues grouped by tenant
Revenues grouped by unit for a building
Revenues grouped by vendor
Revenues grouped by vendor for a landlord
Security Deposits
Security Deposits for a building
Security Deposits grouped by building
Security Deposits grouped by building for a landlord
Tenant Statement
Tenants
Tenants for a building
Tenants for a landlord
Tenants grouped by building
Tenants grouped by building for a landlord
Vacancies
Vacancies for a building
Vacancies for a landlord
Vacancies grouped by building
Vacancies grouped by building for a landlord
Vehicles for a building
Vehicles grouped by building
Vehicles grouped by building for a landlord
Workorders
Workorders for a building
Workorders for a landlord
Workorders for a tenant
Workorders for a vendor
Workorders grouped by building
Workorders grouped by building for a landlord
Workorders grouped by tenant
Workorders grouped by unit for a building
Workorders grouped by vendor
6. Customizations
6.1. Logo/Letterhead
A nice way to personalize your reports, invoices, and receipts can be to include your logo/letterhead on the printouts.
STEP 1: Produce your logo/letterhead
Although LandlordMax has the ability to store and manage your logo/letterhead, you will need to create the image file outside of the software. If you don't have a graphics designer or an existing image file, there are many graphics software applications (including free ones) which you can use to produce your logo/letterhead image that can contain everything from your logo, address, email, to just about anything imaginable. You will need to save the image file in either the JPG or the GIF file formats as show in the image below:
** Important Tip:The software will insert your image exactly as is, therefore if the image is too large it will be truncated (the software does not resize the image). The size of the image depends on a number of factors, including the dpi and so on, so it's not possible to specify just an image width. That being said, an image at 96dpi should use a width of 470px to fit exactly across the full printed page.
STEP 2: Save your logo/letterhead in LandlordMax
Go to the Preferences menu, click Logo in the menu at the top of the screen, click Get at the bottom of the screen. In the popup window, select your image files and click Save. To help you out, displayed on the right side of the window is a thumbnail preview of the picture you currently have selected.
STEP 3: Generate a report with you logo/letterhead
The next time you Generate a report and Print it, you will automatically see your logo/letterhead appear at the top of the first page as illustrated below.
** Please note that if the image is larger than the size of the screen, the software will only shrink the image for display purposes, but not in the printout of the reports. Therefore if you're logo/letterhead on the printout is much too big, you will need to resize the image before saving it in the software.
6.2. E-mails
LandlordMax lets you send emails directly from within the program. It is a time saving feature in that you don't need to step outside of the software, remember an email address, etc. to send a commuication. Therefore, if you are working in LandlordMax and need to send an email, an invoice, a report, etc. you can do it right then and there without having to open your email software.
The first thing you need to do if you want to be able to send emails through LandlordMax is to set the email preferences.
STEP 1: Set up email server configuration
Go to Preferences menu, click Email preferences at the top of the screen, in the first field Select Preference Group, choose Email Server Configuration from the dropdown list. In the second field Select Email Type chose between Mail sever, Outlook, Gmail from the dropdown list. Enter the info if specified and then click Save at the bottom of the screen.
If you are working with Outlook, your emails will be sent through the default email account you have set up in Outlook. If you have more than one email account setup, again please note that it will use the email addressed configured as the default one in Outlook. The software only supports Outlook and not Outlook Express, Windows Mail, or Windows Live Mail.
If you select Gmail, please note that you have to enabled third party access from your gmail account. Please note that Gmail, Gmail, Yahoo Mail, etc. all generally require you to allow third party software systems to connect to your email account to work. In other words there is a setting within your Gmail account on their website that you need to set to give permissions to programs like LandlordMax to connect and work.
Although the free email services such as Gmail label it as: "allow less secure apps to connect to gmail", this is more for cloud based setups than desktop applications where OAuth (their prefered authentication method) is NOT available. The link to the instructions for Gmail is: https://support.google.com/accounts/answer/6010255?hl=en You can also read an article written by one of the original designers of the OAuth authentication used by Gmail at: http://hueniverse.com/2012/07/26/oauth-2-0-and-the-road-to-hell/ which basically explains that both systems are pretty much equivalent in terms of security.
If you have an internet provider such as Comcast, Rogers, etc., or your own domain (mailserver), you need to enter the information specific to your email server. This information is specific to your email server (mailserver) and is not something we can provide. For example, port 25 is the default email port for most mailservers, however it's not uncommon for many email service providers to change the ports to make it harder for spammers and such. This is a value you have to get from your email service provider, it's not something we know. Don't hesitate to contact them or whoever helped you setup your email.
We then suggest you to click Send Test Email on the right side of the screen and send yourself a little test email message to make sure everything is set up correctly.
STEP 2: Set up email signature
You can set up an automatic email signature which is basically a template to start all your email addresses with. For example you may want your contact info be displayed at the end of every email you send as illustrated below.
Go to Preferences menu, click Email preferences at the top of the screen, in the first field Select Preference Group, choose Email Signature from the dropdown list. In the box below, type your template and then click Save at the bottom of the screen.
STEP 3: Set up BCC email preferences
BCC are like sending a hidden copy of your message to yourself or someone else. This is not necessary for Outlook or Gmail because they automatically record all emails you sent in a special folder called "sent". But it is useful for other mail servers since LandlordMax does not keep a history of your sent emails if you wish to keep them. A general rule of thumb with BCC and sent emails is that if you don't know what they are, you probably don't need them.
Go to Preferences menu, click Email preferences at the top of the screen, in the first field Select Preference Group choose Email BCC Preferences from the dropdown list. Tick the box Enable BCC, below type your own email address (or any other you may wish to use) and then click Save at the bottom of the screen.
STEP 4: Send an email to a contact
Let say you are working in LandlordMax and want to send a an email to one of your contact, depending on if the person is a landlord tenant etc., go to the corresponding menu on the left, click on the name of the person and click Email in the top menu. Note that you can select more than one name to send your email to, their email addresses will all appear in the "To" field. In the email that popups, add a subject and type in a message then click on Send to send the email.
Outlook may then open a message window (depending on your security settings OR if you're antivirus solution is not updated) to ask permission for LandlordMax to access it. If it does click Allow in order for your message to be send. **Important Notice: Note that it is possible that this message is hidden behind the LandlordMax screen.
You can also choose to add another person to send your email to in the popup window by typing an email address directly in one of the appropriate fields or by clicking on Get on the right side to get further email addresses from within the software.
If you click Get, a popup window will appear at the top of which there is a field where you can chose the Type of Contact from a dropdown list, choose between All, Contacts, Landlords, Tenants or Vendors. Scroll down the list of names and click on the one (or the ones) you want to send the email to, then click Select at the bottom of the window. Note that if the names are greyed out it means that there is no email configured for that name in the database.
STEP 5: Send an invoice or receipt by email
You can send any email or invoice directly to the tenant by email from right within the software.
Go to Invoice Menu, choose to View one invoice from the list you have, then click on Email at the top menu. By default, the invoice will set the "To" field to the tenant specified in the invoice. In the email that popups, add a subject and type in a message then send. Note the file attached name is corresponding to the invoice number.
You can only email one Invoice at a time because of several reasons. Firstly each invoice requires a different "to:", attached file, and a different message. As well, sending all your invoices at the same time can result in your email address, domain, and/or server being incorrectly flagged as sending spam emails which can lead to all sorts of complications and problems for your email address. In other words you don't want to be incorrectly flagged as a spam mailserver which can happen if you send too many emails all at once in an automated manner.
STEP 6: Send a report by email
One very handy feature you can do is send reports by email directly within the software without having to export your report, open your email software, attached the report and then send it.
Go in Report Menu, generate a report of your choice, click Email on the right side of the screen. In the email that popups, type the email address of the person you want to send this report or click Get on the right side to find the email address from the bank of contacts you have in LandlordMax.
Type in the subject and message. The report will be automatically attached to you and be named according to the title you used for the report in (from the "Report Title" field). You can then click on the Send button to send the email.
6.3. Printing
Pressing any Print button across the application will open a popup window displaying exactly what will be printed WYSIWYG (What You See Is What You Get).
At the top of the window you find three menus. Under Report you can set up the page and print it.
Under the Export menu, you can save the report as a PDF file, a CSV file, etc. A CSV file is very useful for retaining all the data, and it can be imported into Excel, etc. The difference between the Exporting to Excel to CSV is that the Excel export retains all the formatting and graphs at the cost of potentially having values truncated where they don't fit to maintain the formatting. Therefore if you prefer to have the full data (for example the full description text) rather than the exact formatting (spacing, etc.), then export to CSV is the better option for you because it will contain all the data, regardless of formatting and spacing issues. You can then import the CSV file into Excel and simply adjust the format to how you prefer (changing the column lengths, etc.), if at all.
The view menu is for you to zoom into the page.
Below the menus, there is a bar composed of icons that have different functions. The first one is to edit the Page Setup. The next one will print the pages. The four arrows are used to navigate between the different pages of the report. The last three icons are used to zoom in and out of main view area.
The generated reports can be customized. (For example see Logo/Letterhead) The report template files are stored under (assuming a Windows based computer - the Mac is dependent on your User Account name) in the C:\Program Files\LandlordMax\reports directory. All templates for every report and workarea printout can be found in this directory.
** Important Note: Although it is possible to customize the printout templates to a required layout please be aware that there is NO support for ANY modifications to the templates. Modify at your own risk!
If you are interested in having your reports customize by us, we do offer this service at a rate of $150/hour. For more details you can contact us here at: info@landlordmax.com.
6.4. Table sorting
Besides the filters, there is another mean to sort your data, both in the tables and reports. In the software, all tables can be sorted by any column. Once you've sorted a table, the order will be permanently remembered (even when you quit and restart LandlordMax) until you change it again.
SECTION 1: Sort a table according to one column
To sort a table column you simply have to click on the column header.
When you click once, the number 1 appears next to the header. It is preceded by a pointing up arrow indicating that the order is ascending. When you click twice the arrow is now pointing down indicating that the order is descending. If you click a third time, it goes back to the original default sorted order.
In the example below, the first image is the data sorted by default with the alphabetical order of the names. In the second image, after one click on the Status column header, the data is now sorted by the Status order.
SECTION 2: Sort a table according to multiple columns
You can sort a table according to two or more columns (for example Names and Statuses).
To do this, click on a first column header, then while holding down on the Control key on your keyboard, click on a second Column Header. Again the number is preceded by a pointing up arrow indicating that the order is ascending. When you click twice the arrow is now pointing down indicating that the order is descending. If you click a third time, it goes back to the original order.
In the example below, the first image is sorted by Status. In the second image, after two clicks on the header Name holding down on the Control key, the data is further sorted by Name (Status first and Name second). Similar statuses are still sorted together but the order of the names within those statuses is now also sorted accordingly.
All tables can be sorted by any column within LandlordMax with the exception of reports where the data is grouped into categories (for example the report "All accounting entries grouped by buildings") by simply clicking on the Table Column Header. Once you've sorted a table, the order will be permanently remembered (even when you quit and restart LandlordMax) until you manually change or remove it.
A table can also be sorted according to multiple columns. To do this, first click on the Table Column Header of the table you wish to have sorted. Then while holding down on the Control key on your keyboard, click on the second Table Column Header you wish to have sorted. A number 2 will appear in that column, meaning that it takes secondary precedence in sorting as can be seen in the screenshot below.